FFG NOTE THE DIFFERENCE Cello Fingerboard Stickers, 1/4 Size

$14.95
FFG NOTE THE DIFFERENCE Cello Fingerboard Stickers, 1/4 Size Price comparison


- All prices mentioned above are in United States dollar.
- This product is available at Walmart.com, Knetbooks.com, BetterWorld.com - New, Used, Rare Books & Textbooks, Barnes & Noble, SHEIN.
- At walmart.com you can purchase WHAMVOX Fingerboard Stickers Violin Fretboard Tape Note Positions Chart for only $5.16
- The lowest price of Cremona SV-488 1/4 Cremona SV-488 Premier Artist Violin Outfit 1/4 Size was obtained on July 18, 2026 18:58.
FFG NOTE THE DIFFERENCE Cello Fingerboard Stickers, 1/4 Size Price History
FFG NOTE THE DIFFERENCE Cello Fingerboard Stickers, 1/4 Size Description
Unlock Your Cello Potential with FFG NOTE THE DIFFERENCE Cello Fingerboard Stickers, 1/4 Size
Discover the FFG NOTE THE DIFFERENCE Cello Fingerboard Stickers, ideal for young musicians seeking to improve their skills. Designed specifically for 1/4 size cellos, these fingerboard stickers help demystify the fretboard, allowing musicians to focus on their technique and play with confidence. This product improves learning efficiency and enhances practice sessions, making it a must-have for both beginners and experienced players alike.
Key Features of FFG Fingerboard Stickers
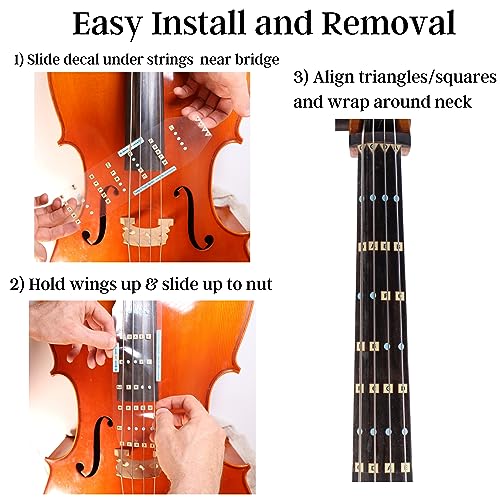
- Easy-to-Apply Stickers: These stickers adhere smoothly without damaging your cello’s finish, ensuring a hassle-free experience.
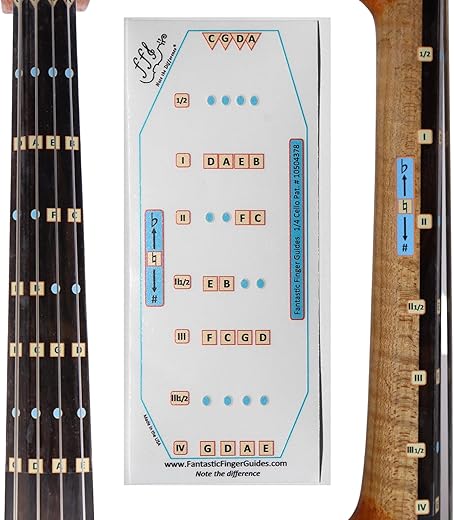
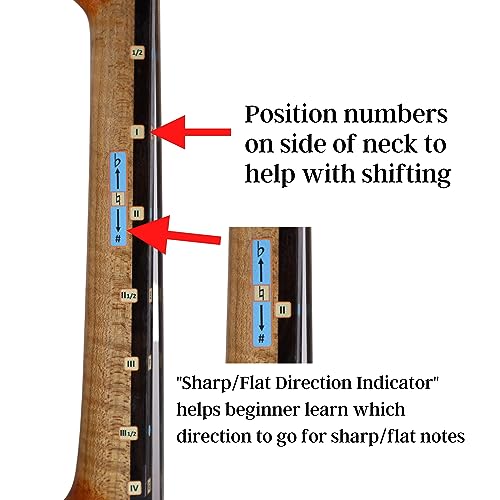
- Clear Note Markings: Each sticker features vibrant colors to clearly indicate note locations, enabling quick visual reference while playing.
- Durable Material: Made from high-quality materials, these stickers are designed to withstand regular play and practice.
- Perfect for Beginners: An excellent learning aid, the stickers simplify learning for beginners, allowing them to know where to place their fingers without hesitation.
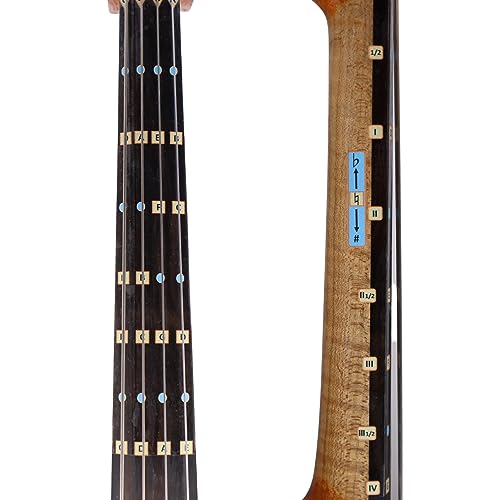
- 1/4 Size Compatibility: Specifically sized for 1/4 cellos, ensuring a snug and appropriate fit.
- Increases Practice Efficiency: With these stickers guiding finger placements, students can focus on rhythm and technique rather than getting lost in note locations.
Your Go-To Cello Accessory: Price Comparison
When considering the investment in FFG NOTE THE DIFFERENCE Cello Fingerboard Stickers, a comparison of prices reveals its affordability compared to competing options. Priced competitively, you can find it at various retailers, ensuring you get a great deal without sacrificing quality. Our price comparison tool helps you find the best price among multiple suppliers, guaranteeing savings on your purchase.
Insights from the 6-Month Price History Chart
Our comprehensive 6-month price history chart indicates a steady pricing trend, illustrating its affordability within the musical accessory market. Notably, prices have remained consistent, providing assurance that investing in these stickers is a sound choice for your cello needs.
Customer Feedback: Reviews and Drawbacks
Customer reviews overwhelmingly praise the FFG NOTE THE DIFFERENCE Cello Fingerboard Stickers. Users report that the clear markings significantly ease their learning experience, and many appreciate how these stickers have assisted both children and adult beginners. The vibrant colors are mentioned as particularly helpful for quick visual recognition.
However, some users have noted that the stickers may wear over time, depending on playing frequency. It is always recommended to monitor the condition of the stickers and replace them as necessary to maintain optimal visibility and guidance.
Explore Unboxing and Review Videos
To further enhance your understanding of the FFG NOTE THE DIFFERENCE Cello Fingerboard Stickers, check out available unboxing and review videos on platforms like YouTube. These visuals provide insight into the product’s application, ease of use, and effective teaching capabilities. Witness firsthand how these stickers can transform your playing experience.
Why Choose FFG Fingerboard Stickers?
If you’re in search of an effective learning aid for your cello journey, the FFG NOTE THE DIFFERENCE Cello Fingerboard Stickers, 1/4 Size is a stellar choice. Designed with the musician’s needs in mind, these stickers provide clarity, efficiency, and confidence in your playing ability. Say goodbye to confusion on the fingerboard and hello to a brighter musical future!
In summary, with their easy application, clear notes, and durable quality, FFG NOTE THE DIFFERENCE Cello Fingerboard Stickers stand as a top choice for cellists at all levels. Whether you are studying privately or in a group setting, these stickers will undoubtedly aid in your learning process.
Ready to elevate your cello practice? Compare prices now!
FFG NOTE THE DIFFERENCE Cello Fingerboard Stickers, 1/4 Size Specification
Specification: FFG NOTE THE DIFFERENCE Cello Fingerboard Stickers, 1/4 Size
|
FFG NOTE THE DIFFERENCE Cello Fingerboard Stickers, 1/4 Size Reviews (13)
13 reviews for FFG NOTE THE DIFFERENCE Cello Fingerboard Stickers, 1/4 Size
Only logged in customers who have purchased this product may leave a review.
Denise H. –
Learning cello on my own (with help from Udemy lol). This is a really great little tool to help me get my fingering right. I was able to hit notes by sound, like i could tell if i was a bit flat or sharp, but this makes it a lot easier. I’m hoping that with practice i’ll start to know right where to place my fingers.
I like this way better than those tape markers…I get that they’re really basic but this is more helpful. You can see what note, not just where. I like too that they differentiated the natural and open notes, as well as the sharps and flats.
It’s a bit of a struggle to get it on correctly. Try sliding it behind the strings while still on the backing…that way you get the feel for where it needs to go and where you may need to do a little repositioning. Once you’re ready, it takes a couple of minutes to apply, and to get everything aligned.
It seems nicely sturdy, unlike the tapes that tend to plop off randomly.
Really neat, useful little tool for the budding cello player. Highly recommend!
Chris Marshall –
Pour débuter c’est parfait.. bien pense
Laura L. –
My oldest has been playing for 7 years and my youngest just started this year. To help her practice her older sister installed this sticker guide to her cello. She now plays confidently knowing where her fingers should be to create notes as she learns. The size was perfect and we did not need to trim any as other reviews stated.
J’adore!! Le son est vraiment bon!! –
Muy buen articulo, recomiendo enormemente quitar las cuerdas completamente para poder colocar el Stiker (por asi llamarlo) al instrumento , pues al intentarlo colocar con las cuerdas puestas el stiker se pegaba con ellas y pega con ganas por lo que es muy desastroso quitarla, acomodarla e intentar de nuevo por lo que es muy necesario quitar las cuerdas para colocarlo bien, pero ya en la practica es muy practico poder ver donde van las notas para las sesiones de practica, te facilita que tanto se deben de separar los dedos para lograr la digitacion adecuada, recomiendo para los novatos que van a aprender a usar el Cello
Mario –
Ne correspond pas pour un violoncelle. Descriptif erronée sur l’article c’est pour un violon.
Catalyst –
I love this! I decided to take up the cello at age 47, and with this product I’m light years ahead of where I’d be without it.
It was ridiculously easy to install and it’s really helped me learn where the notes are and jump ahead to using a bow since I’m not stressing over where my left hand needs to be. I’m 2 lessons into formal training and my teacher is thrilled with me progress. Since I have a visual reference of what note is where, I can explore freely instead of waiting and learning one note at a time. I absolutely love this! ❤️
Client d’Amazon –
I find this a valuable aid and spot on for tuning
Kirsten –
Well I agree with the difficulty of putting it on and I have been a glue chemist for 45 years. The other thing about the correct spacing….I’m guessing it’s the placement of the bridge and the way the nut is cut along with the scale length…there are some 7/8 size floating out there….the string gauge affects that too….You need an ear to play a stringed instrument…..and fingertips are all different….for the people that say every note is sharp? Call me crazy, but put your finger just behind every note. Depending on how your touch is, you can make a note any sort of pitch that you want….most beginner instruments are crap and not set up right anyhow. I am an amateur luthier and believe me, NO stringed instrument comes from the factory with a good setup….and the lack of a good setup is the major reason why people give up instruments…difficult to play even if you did everything right. EVERYTHING has to be right on a stringed instrument and on many instruments that is NOT possible. Even if you are a beginner, try to get the best instrument that you can afford….My experience is that it might not be a bad idea to buy from an individual who is stepping up and that plays in an orchestra or has been taking lessons and get your instructor to try the instrument BEFORE you buy it.
K_G_1 –
Guides line you up perfectly, relatively easy to apply, though a little tricky to get under the strings without sticking before you’re ready, application is super super easy if the strings are removed. I have not tried removing it, but it sticks well with no visible bubbles and no edge peeling, so it does not change the feel at all under your fingers or look bad. Having the notes and flats all specifically labeled is also extra helpful as you’re beginning.
K_G_1 –
After reading several of the reviews that stated the note markings were not in quite the right spots, I decided to check it before applying it. I simply left the decal on the backing paper and applied some two sided tape to the back. I was then able to test the resulting notes when my fingers were placed in the marks. Sure enough, they were sharp all the way up the finger board. My simple solution was to trim the top 1/4″ or so of the decal. Once applied, this resulted in the marks being moved a bit farther toward the nut and now all the marks are right where they need to be. The only downside to this is that the CGDA letters marking the open strings were removed, which is pretty minor. Other than needing that slight modification, the decal is fantastic for beginning cello players.
Trisha M –
I was very happy with this product. I also ordered and received the fingerboard tape for my violin – a smaller version of this same product. What’s awesome about this product is that the tape includes positions for both sharps and flats and half steps. It also identifies placement for First, Second and Third Position. I had to be careful putting on the tape and if you scan the QR code – the seller has made a short instructional video which shows you exactly how to do this. I was super impressed with both the product and the fact that the seller explained how to install the tape and gave warnings about not letting the tape set on the instrument longer than 15 mins before final placement. Great little product and cheaper than it’s immediate competition. Have used ones from other sellers on Amazon which weren’t as good as this one. Very impressed.
gluedr –
I was amazed at how quickly we received this. It was fairly easy to install with very easy to follow instructions (provided in a linked YouTube video). Take care to keep the sticker tight to the underside of the strings until you get it into position. Once installed, I tested the fingering with a vibration tuner attached and the notes were spot on! This will be such a valuable tool to help my Granddaughter learn her fingering. Thank You!!!
Cassandra R. –
I am re-learning the cello after 25 years and realized I needed a finger guide. This has every finger position a beginner will need, and with *careful installation* is very accurate and incredibly helpful. Installation has to be done INCREDIBLY carefully or it won’t align and folds and bubbles can occur. Think of it as installing window tint. To install, make sure it is straight and fully at the top of the fingerboard for accuracy. I found the easiest way to install was to carefully slide under the strings at the base of the fingerboard where there’s more room under the strings and gently slide up along the strings to the correct position (without touching the sticky side to the fingerboard!) until you are ready to place.