G2 G2 High Gloss Brake Caliper Paint G2160

Original price was: $79.99.$69.99Current price is: $69.99.
G2 G2 High Gloss Brake Caliper Paint G2160 Price comparison


- All prices mentioned above are in United States dollar.
- This product is available at The Tire Rack, Walmart.com.
- At tirerack.com you can purchase G2 Brake Caliper Paint System G2160 for only $58.00 , which is 15% less than the cost in Walmart.com ($67.99).
- The lowest price of ERA Paints Green Brake Caliper Paint With Omni-Curing Catalyst - 2K Aerosol High Gloss Chemical Resistant and Extremely Durable Against Color Fade and Brake Fluid was obtained on July 19, 2026 17:50.
G2 G2 High Gloss Brake Caliper Paint G2160 Price History
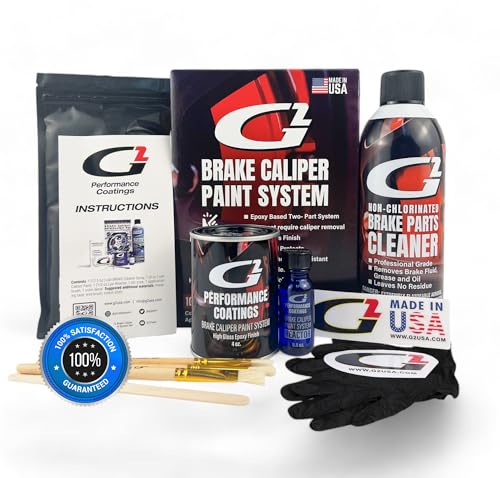
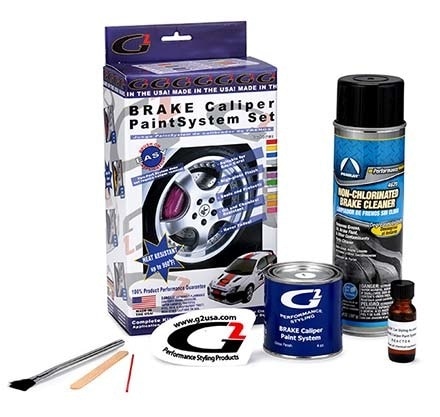
G2 G2 High Gloss Brake Caliper Paint G2160 Description
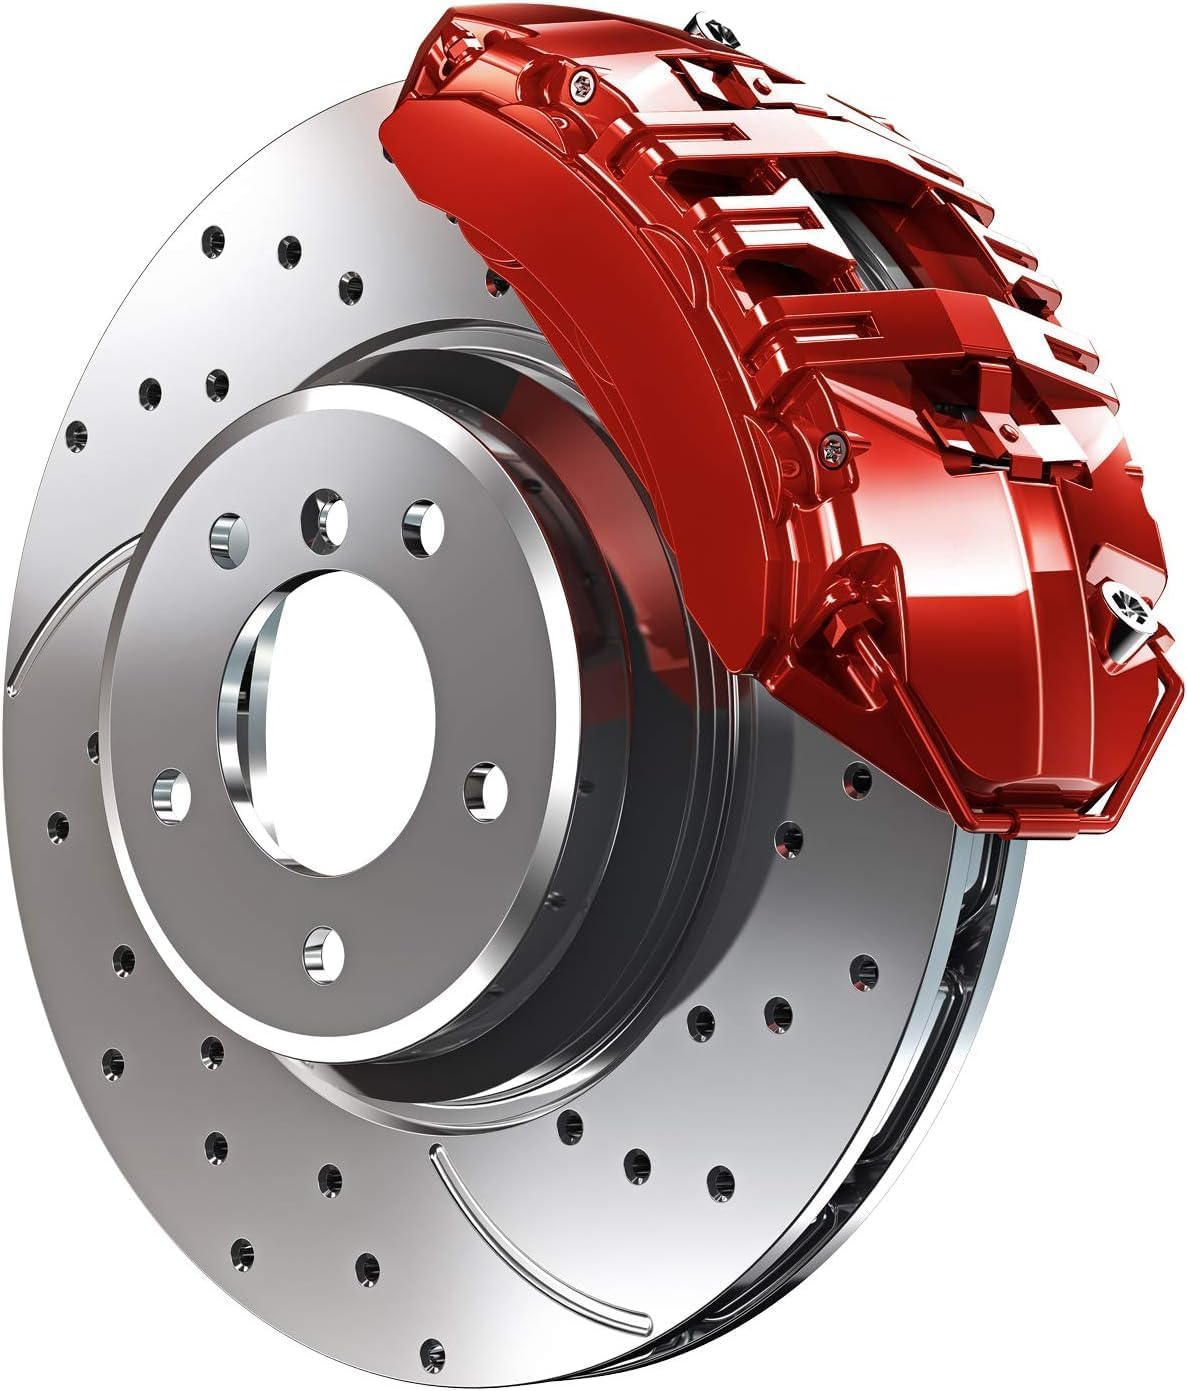
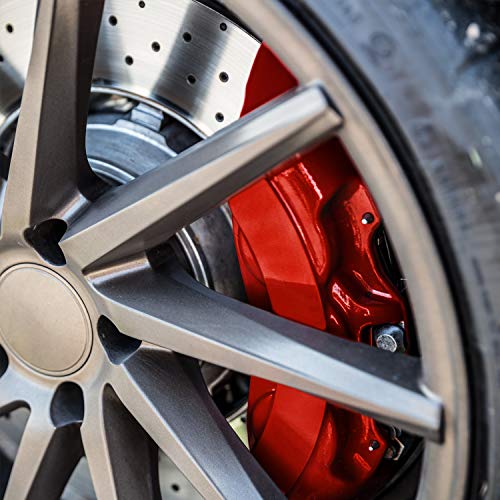
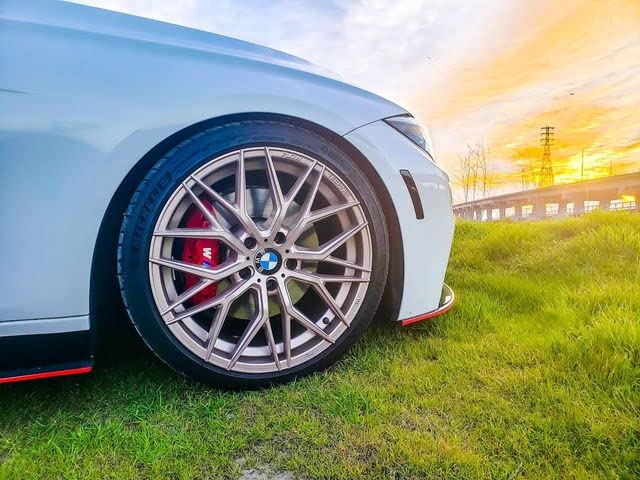
G2 High Gloss Brake Caliper Paint G2160 – Transform Your Ride
Revamp your vehicle’s aesthetics with the G2 High Gloss Brake Caliper Paint G2160. This premium-quality brake caliper paint not only enhances the look of your brakes but also provides superb protection against rust and wear. Perfect for automotive enthusiasts and DIYers, G2’s innovative formula ensures a long-lasting, high-gloss finish back to your ride.
Key Features of G2 High Gloss Brake Caliper Paint G2160
- Durable Finish: G2’s paint boasts a high-gloss finish that withstands heat and brake dust, ensuring your calipers look brand new for years.
- Easy Application: This brake caliper paint kit includes all necessary components for a hassle-free application, making it perfect for both seasoned and novice users.
- Heat Resistant: With a voltage rating of 12 volts, G2’s paint is engineered to endure the high temperatures produced during braking.
- Made in the USA: Manufactured with quality and precision in the USA, ensuring reliability and satisfaction.
- Complete Kit: The G2160 model includes everything you need, from paint to application tools, simplifying the enhancement of your vehicle’s brake system.
How G2 Paint Compares Across Suppliers
The price of G2 High Gloss Brake Caliper Paint G2160 varies across different suppliers, allowing you to choose the best deal that suits your budget. Ranging from $25.99 to $34.99, you can find competitive prices that reflect the quality and effectiveness of this brake caliper paint. Make sure to compare prices for the most attractive offers.
Price Trends from 6-Month Chart
Examining the 6-month price history, G2 G2160 has shown consistent pricing with a slight dip observed in the past few months. Monitoring these trends can help savvy shoppers score the best deals on this sought-after product.
Customer Reviews of G2 G2160
Customer feedback on the G2 High Gloss Brake Caliper Paint G2160 highlights both its impressive quality and minor drawbacks. Many users rave about the ease of application and the vibrant finish, stating that their vehicles look stunning with this paint. Reviewers often express satisfaction with its durability, reporting that the paint withstands harsh conditions and maintains its shine.
On the flip side, some users have noted that achieving a perfect finish requires precision during application—any missteps can lead to uneven coverage. Additionally, a few reviewers recommend ensuring proper surface preparation for the best results. Overall, the feedback underscores the effectiveness of G2 G2160 for achieving a professional-grade look.
Related Unboxing and Review Videos
For those interested in visual feedback, various YouTube unboxing and review videos showcase the G2 High Gloss Brake Caliper Paint in action. These videos provide helpful insights into the application process and highlight the results after painting. Watching these clips can give you a clear understanding of what to expect when using G2 G2160 on your vehicle.
Why Choose G2 High Gloss Brake Caliper Paint G2160?
The G2 G2160 is more than just paint; it’s a quick, cost-effective method to upgrade your car’s aesthetics. The exceptional durability, heat resistance, and glossy finish ensure you get a performance and visual upgrade. Additionally, with a user-friendly application process, even beginners can achieve impressive results.
When looking for G2 G2160 price options or G2 G2160 review information, you’ll find that many consider this product a must-have for any car enthusiast looking to add a personal touch to their ride.
Enhance your vehicle’s appearance today with G2 High Gloss Brake Caliper Paint G2160. Don’t wait any longer to upgrade those calipers to impress at your next car show or simply to brighten your daily drive.
Compare prices now!
G2 G2 High Gloss Brake Caliper Paint G2160 Specification
Specification: G2 G2 High Gloss Brake Caliper Paint G2160
|
G2 G2 High Gloss Brake Caliper Paint G2160 Reviews (11)
11 reviews for G2 G2 High Gloss Brake Caliper Paint G2160
Only logged in customers who have purchased this product may leave a review.

Mary –
FIRSTLY – it does look purple in the can, it dries blue, I’ll post after pics. This is an obvious concern, and a few reviews here made me sketchy. Wet paint and dry paint don’t always look the same people, especially when it’s special purpose paint with add-in activators.
I used this a 2004 Mustang with Sonic Blue paint (one of the pics has part of the car in it so you can see the compare of the blues for reference). G2 will send you a color swatch free in the mail from their site btw, that’s what I did. I also copied it from thier site and used Photoshop to place it on a pic of my car to give me an idea how it’d look.
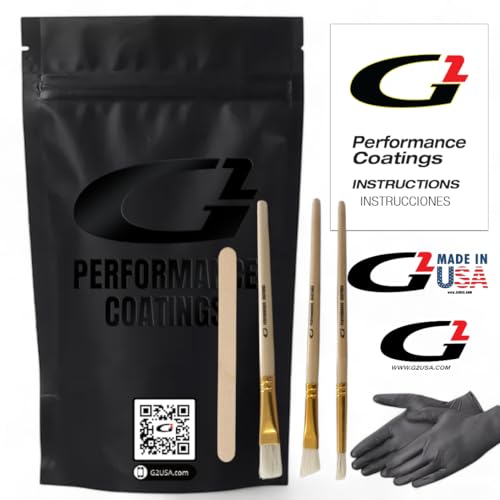
Got the package promptly, inspected it. It was packed like crap but unbroken. In the product box you’ll find –
A spray can of brake cleaner
Can of paint, a little more than half full, this is so you have slush and mixing room.
A glass vial of activator
A paint brush. Brush itself isn’t bad quality, but way to small for this use, it would take you all day!
A Popsicle stick mixer, works fine.
Instructions
Other things you’ll need and/or want –
Better brushes! I got 1 inch wood chip brushes locally for $7 cents each, I got several. These worked well, but be careful as the bristles come out easily and stick to the paint. I also got some smaller detail brushes for the little spot the bigger brushes couldn’t hit.
Tape, I used Scotch Blue Painters tape, worked great.
Gloves, masks.
A can of brake cleaner, just in case. I’m sure the one they give you will be enough if all you’re doing is calipers. I think I went through about 1.54 cans. I actually used some Brakleen I already had on hand.
PATIENCE! Seriously, take your time on the cleaning part, it’ll be worth it!
Can’t thing of anything else I used that was specifically caliper paint related.
Here’s how I did this…
Read the instructions.
Put the car up on stands. The paint is only good for a few hours after you mix it so you can’t really do one caliper at a time.
I was painting my rotors, dust shields and wheels as well on this project, so I took the calipers off the car.
I did not disconnect the lines, just placed them on boxes under the wheel well.
Cleaned everything on the car extremely well, steel brushing, sanding, steel wool, spraying, etc.
Since the calipers were off, I didn’t worry about taping anything off for that part. (I taped and placed cals under paper when spraying the shields)
Read the instructions – again!
Mixed the paint and activator in can using the popsicle stick.
NOTES on color – IT LOOKS PURPLE IN THE CAN!!! It DOES turn blue as it dries, I’ll post after pics.
Paint time! I did one light coat all around. I took time, about ten minutes from start to reach the first caliper again, which is the coat time, perfect.
Second coat was a little heavier, filled in gaps missed on first coat.
Third coat, about the same heaviness of second, any heavier you’d have runs and dripping.
Fourth, and final, coat. By this time, it was clearly blue in color.
Three coats probably would have been fine. There’s plenty of paint for more though, probably could’ve gotten a fifth still.
Since I bought a ton of those 1 inch brushes, I’d used a new one for each coat.
Allow to dry overnight before use.
Since I still had the rest of project to do, it was actually 2 days before I put anything together again.
Pay attention to your weather too. I started this in the morning, but being in San Diego, it got real hot, real fast. I did the whole project in about a week as a result of the heat and sun.
I put everything back together, wiped some grease of the calipers – that was awesome, it just wiped off cleanly with a towel!
I choose to add a “Mustang” decal to my calipers, this would be the time to do so if you choose (for your car of course).
Remember to push your brake pedal a couple times before drive off. Enjoy!
There are tons of vids available for this, I watched a few, learned a little 🙂
Also of note, I did smell some paint burning when driving the first few days, especially when braking hard. Not sure it this was the caliper paint or the rotors, or the heat/dust shield (I used a different black caliper spray paint and high heat spray paint paint for those).
I’d definitely recommend this product if you want a little extra class on your ride. It’s been only a couple weeks since I applied it, but it still looks great! It’s comes out a glossy medium blue. G2 also sells color coded paint too, for twice the price.
Amazon Customer –
It’s been a year and so far so good. No flaking or chipping and most importantly no fading of the colour. I would be nice if it was a bit thinner so that applying it might have been easier. But then again it might harden before you could apply the extra coats. I divided the kit into four and did each corner separately with the calipers/ brackets off so I didn’t feel rushed before it hardened. Get some extra brushes.
Amazon Customer –
Requires some work to prep calipers but the product works as advertised and looks great!
Kendrick –
Easy to apply. Looks awesome
Mary –
Easy to use. Applies very smoothly. A quality product that looks great;
Amazon Customer –
Perfect and EXACTLY as described. It looks magnificent on my rotors. I will DEFINITELY purchase again from this seller!
John N. –
This came up really well
Thank you
E. mak –
What I like:
+ Simple to use
+ Large can of brake clean
+ Good looking end result
What I don’t:
– Included paint brush is worthless
– It is pretty expensive for paint
– Foam packing peanuts
Fairly simple well packed kit, paint, hardener, crappy paintbrush, decals and a lots of little messy foam peanuts.
Please keep in mind that this G2 Paint Kit only only one part of the entire painting process (the other is labor). If you’ve ever painted anything half decent you’ll know that to get good looking results you want to put a lot of effort into preparation. What this means if you’ll want to take your time getting your caliper surfaces spotless to give the paint a good surface to bond to. The kit includes a fairly large can of brake clean to help you do just that. You’ll want to take a 3M Scotch Brite Heavy Duty Pad (not included) and work it until the metal is spotless. My calipers went from a graphite gray to stainless steel gray after a few brake clean / scrub cycles. If you don’t do this well you risk having paint flake off in the future forcing you to redo the work.
Important note: Use proper respiratory protection, brake dust is nasty and you’ll be kicking it up while cleaning and you certainly don’t want to breath it in. I used a 3M N95 (not included) particulate mask but recommend considering something stronger since the fumes from the solvents (brake clean + G2 paint) had me feeling pretty nauseous by the end of the experience.
Once you’ve cleaned and optionally masked your surfaces you get to the fun part; painting. Pour the entire little jar of hardener into the G2 paint, shake vinously and wait for it to bubble and start applying. This starts a count down timer and leaving you with only 3 hours to finish. You should finish with plenty of time since you will probably spend a little over an hour coating all four corners (2 – 3 times). I *highly* recommend buying quality paint brushes because as soon as the hardener is mixed in with the paint it rapidly starts turning viscous and sticky the little paint brush that is supplied is poorly made and will not hold up as it gets thicker and stickier. I used some Behr’s nylon paint brushes (not included) to give thin even coats.
The first coat of G2 is one of the most important and you should definitely heed the instructions and apply a thin coat. The instructions say to leave 15 minutes between coats for drying time. This should be perfect for you to go around and paint the three other calipers and come back and do another coat. You can use a slightly heavier second coat to fill in gaps in coverage. I let the second coat sit for a little bit longer and while the paint claimed to be self-leveling there were tiny ridges / rivers. I took a 3M 150 grit sanding block (not included) and smoothed those out. I added one additional thin coat to this and according to the instructions you’re done. If you have decals this would be a good time to add them in. Otherwise the wait 2 hours and put your wheels back on. If you purchased scotch brite pads like me for prep you might as well take one (not the same one soaked in solvent b/c brake clean will damage OEM clear coat) and clean the inside of the rims; clean rims help reflect light / glow that will enhance your freshly painted calipers. 🙂
Important note: the instructions state you should give it 24 hours time to cure before driving, plan accordingly.
E. mak –
I recently used this brake caliper paint, and overall, I’m quite pleased with the results. There are several pros to this product. First, there’s plenty of paint included, which is great because the yellow color requires several coats to achieve a nice, even finish. The yellow itself is bright and vibrant, making the calipers really stand out. The paint also seems to be high quality, adhering well to the calipers and providing a durable finish.
However, there are a couple of things to keep in mind. The brush included with the paint isn’t the best quality, so I highly recommend purchasing your own brush to ensure a smoother application. Also, the paint is on the thinner side, so it will take several coats to cover the calipers properly, especially with the yellow color. And be aware that there is a bit of a smell, so it’s best to work in a well-ventilated area.
Despite these minor issues, I’m happy with this purchase. The end result looks great, and the product performs well. Just remember to have a good brush and patience for the multiple coats, and you’ll be very satisfied with the outcome!
Jaiden –
superb
Kendrick –
easy to follow, brushed my calipers prior to applying paint for better results. Box said 2 coats recommended or more if allowed, I put about 3 coats and touch ups on certain areas and still had about maybe couple more coats of paint in the can. This paint seems to be more effective than spray cans as its brighter when finished.