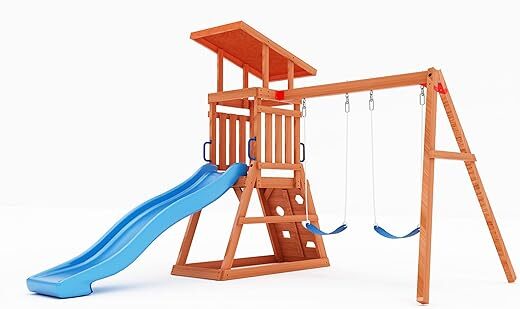
Backyard Discovery Skyfort II Cedar Wood Swing Set


Set Lowest Price Alert
×
Notify me, when price drops
Set Alert for Product: Backyard Discovery Skyfort II Residential Wood Playset in Brown | 6113COM - $1,764.71

Last Amazon price update was: September 16, 2024 14:16
×
Product prices and availability are accurate as of the date/time indicated and are subject to change. Any price and availability information displayed on Amazon.com (Amazon.in, Amazon.co.uk, Amazon.de, etc) at the time of purchase will apply to the purchase of this product.
Backyard Discovery Skyfort II Cedar Wood Swing Set
$1,764.71
Backyard Discovery Skyfort II Cedar Wood Swing Set Price comparison


Backyard Discovery Skyfort II Cedar Wood Swing Set Price History
Price History for Backyard Discovery Skyfort II Residential Wood Playset in Brown | 6113COM
Statistics
| Current Price | $1,764.71 | September 16, 2024 |
| Highest Price | $1,764.71 | August 19, 2024 |
| Lowest Price | $1,764.71 | August 19, 2024 |
Since August 19, 2024
Last price changes
| $1,764.71 | August 19, 2024 |
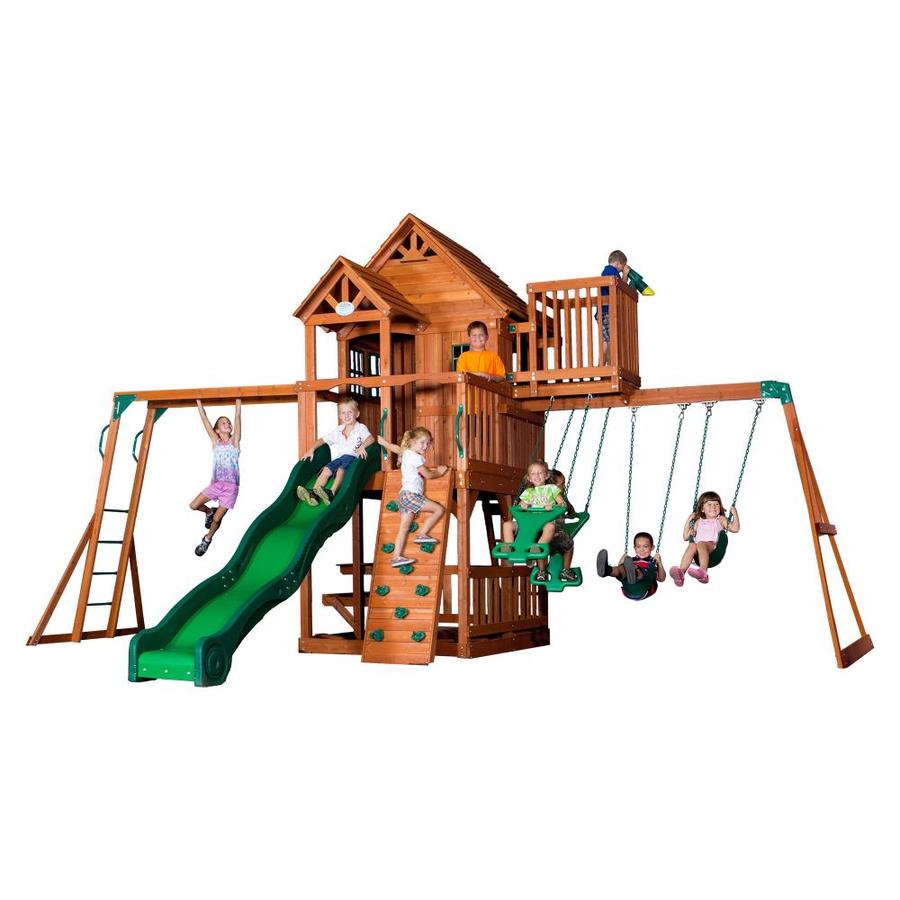
Backyard Discovery Skyfort II Cedar Wood Swing Set Description
- Raised Clubhouse With Wood Roof, Windows, Covered Entry Way, And Bay Windows
- Front Porch With Sun Balcony
- Crow’S Nest With Telescope
- Lower Deck With Snack Stand And Picnic Table
- Two Belt Swings And A Trapeze
- Rock Climbing Wall And Flat Step Entry Ladder
- 10Ft. Speedy Slide And Monkey Bars
- Easy Assembly – Supported By The Step-By-Step Interactive Bilt App
- Stain Saturation May Vary
- 5 Year Limited Warranty
Backyard Discovery Skyfort II Cedar Wood Swing Set Specification
Specification: Backyard Discovery Skyfort II Cedar Wood Swing Set
|
Backyard Discovery Skyfort II Cedar Wood Swing Set Reviews (2)
2 reviews for Backyard Discovery Skyfort II Cedar Wood Swing Set
Show all
Most Helpful
Highest Rating
Lowest Rating
Only logged in customers who have purchased this product may leave a review.
Related Products


J. Kraus –
I really love this set. Does it take forever? SURE! But… here’s what I did:
After its arrival, my best friend and I used bedtime, and our massive garage, to lay everything out. Very first step? Print the PDF version (found online) of the manual, page by page. I just printed the actual steps pages, and not all the rest. So, use your “print pages” option to save yourself a few trees. Next, I purchased fold top, cheap sandwich bags and had a couple sharpies handy. Then we opened the boxes, and pulled the packing slips out (one box was missing a packing slip, so we just used process of elimination). There is no rhyme or reason for how this all is packed, other than it fits perfectly, into 3 boxes, like a puzzle.
The steps have you put together big items first (monkey bars, swing set assembly, rock wall, rear ladder, crow’s nest base and slide). Then, it goes on to step by step for how to build the clubhouse. After the main structure is together, you attach all the things. We took the first page(s) and found all of the items needed to construct the first big item. We laid them all into a pile, found all of the nuts/bolts/locks/etc and put them into individual baggies (clearly labeled). We piled them all together, and put the corresponding papers on top of it. Then to the next large piece’s parts and pages… and the next, and the next. Soon, all of the main items were placed into piles, with every piece of wood and hardware, with the pages that told you how to construct them, laying on top.
Next, we got to the instructions for each step of the main structure/clubhouse. Since you can’t really “group” them together, we literally went page by page. Each page has what wood pieces and hardware are needed, listed on the top. Some piles had 1 piece of wood, and a bolt or two… some piles had MULTIPLE. (Oh… each baggie, with hardware, I would write something like “monkey bars – bolt # and what size/quantity”… just look at the photos for all of these examples, cause I don’t want to explain it wrong). But, we just went page by page. Laying it all out, in order. This took us 2 nights… just the two of us (and a few adult beverages).
Here was my thought process… I had myself, my husband, and 2 other couples, willing to come over and help FOR ONE SATURDAY. What I didn’t want? One single book, being passed around, people looking for things, using wrong pieces, losing things, etc. If I had them for a day, I needed to make the MOST of it. It totally worked! It was the most methodical madness…ever. All the comments from friends were “I’m so glad you had this all so organized!”
They all came over Saturday morning. They brought their drills and bits (and coffee). We got started right away (about 11AM). Each couple grabbed one of the larger item piles, and put together whatever it was (my one piece of advice? Pay attention to the slide… bolting the wood to the bottom? You need to leave a little slide at the end. The piece of wood doesn’t sit flush with the end of the slide. I missed this. Thankfully, a friend had a good idea with how to fix it, without making more holes in the slide… thank you, friend!). After all of the items were constructed, we set them in the front yard.
It was now on to constructing the clubhouse. This part was harder to work with all 6 hands. But, some were working, and others were grabbing items/tools/instructions/etc. We decided to build most of the clubhouse on the driveway, for a level surface, and easy access to all of the steps, that were still laid out in the garage. Once we got to a point that we felt we should move it, we brought it down (again, refer to photos). From there, we had people bringing each step down, and crews alternating working on the rest of the steps (it was pretty hot that day, so the switching off was nice). But, it was great to have some extra company and encouragement. 😉 Toward the end, we had all the crews connecting the big items, simultaneously, and the lone man up in the crow’s nest (that thing is seriously the most time consuming part of it all). While they were finishing all the last details, I ran to Home Depot, and picked up 15 50lb bags of play sand. I think we wound up only using 12-13 bags, for all of you wondering. By 7PM, every last item was done, the sandbox was filled, and the kids were having a blast.
Later, we got some 5″ edging, and edged out an irregular shape, around the play set. It took about 6 yards of play bark to fill it with a few inches (makes my mama heart feel better, in case anyone falls off). All in all, I’m estimating it took about as long to lay out the parts as it did to put it together. However… it was completely worth it. I would NOT do it any other way. Nothing was lost, broken, installed wrong (except ALMOST the bottom board of the slide). A few pieces were a little warped.. but none were broken. This is WOOD. Not every piece will be perfect.
Do I regret this purchase? Absolutely not! My kids are like “can we go out and play on our park, before dinner?” They love it. They are 3.5 and 2, and play just great on it. It is PLENTY tall. Adults can fit… even up in the crow’s nest. Can I stand up, completely (I’m 5’11”)? No. But we have older children come play on it, and no child has been “too big” for it, yet. I think the oldest child we had was like 10.5? Perhaps older. The slide is long… even I get going a little bit on it. Before I added the wood chips, I could dangle from the monkey bars (there are 4 bars), without touching the ground. With wood chips, I just barely have to pick up my feet. The girls are too small to do the monkey bars alone. I’ve seen some people block off the entrance to it, on the club house, and leave them off altogether, but my kids don’t attempt without us, so we opted to leave it on, for their older friends/cousins. They learned to do the rock wall quickly, and love it. They eat on the picnic table a lot. Downfall? Their friends can NOT keep the sand in the sandbox. I’m debating constructing something that keeps it closed, so those friends can’t get into it… I HATE cleaning up the sand from the lower deck. The seesaw swing is awesome, since the girls aren’t big enough to “pump” on a normal swing really well, yet. They get going on that double swing like crazy, so I don’t always have to be out to push them on the other 2. The telescope is fun. It isn’t magnified, or anything, but nobody has complained.
I can see us getting MANY years of good use out of this. I’m so happy I didn’t get a smaller set. Truly… for the price, you get SO many options for them to play on, and kids of all sizes can fit. It is very very sturdy, and looks beautiful in the yard. I am happy to answer questions!
J. Kraus –
We shopped around very extensively for a swing set for our son (soon to be sons in July) and wanted one that was well designed, had lots to do on it, would fit our space, and had activity areas that our three year old could grow into. We looked at all the warehouse clubs in the area (Sam’s and Costco) as well as specialist shops and every online one we could find. We kept coming back to this one as the best one with the most varied features for the money.
Delivery was well handled – since it’s so large it’s delivered in four boxes that are about 1’hX2’wX8’L. They were nice enough to slide it right into our garage to ensure nothing got wet.
I was able to assemble it with at least one helper in about 14 hours of work but that was after I did my prep. Here’s what you need to do to prep for building:
– Unbox, sort, and lay out all the wooden pieces. Each piece has a letter/number stamped on them (M24, H13, etc.) from the factory. Lay these out in order. One nice thing about this set, the roof panels and floor panels come already assembled and just need screwed down. That will save you at least two to three hours of building right there.
– Sit down with the hardware, the instructions, a box of 100 zip-top sandwich bags and a sharpie. Go page-by-page and sort the needed hardware for a given page into a bag and label it as such. This might seem silly but the hour and a half my wife and I spent doing this while watching TV one night saved three hours + of time during the build.
– Ideally, you need two cordless impact drivers – one with a good phillips bit and one that can take the included T-40 and T-30 bits used for bolts and lag screws. I made do with one impact but it was a lot of bit switching at times and got tiresome.
– You need a drill as well. I think we had to drill maybe 15 holes per the instructions tops. Given how infrequent this is, you can get by with a corded drill for those few times you need it if that’s all you have.
– Other needs: a good smooth-faced hammer (nothing waffle print as it will scar the wood). Having a miter saw helped with allowing me to cut a few guide blocks for the spacing on the pickets. The instructions tell you how much to space them, I think there were three different gaps for the different areas, and having guides helped me not worry about breaking out the measuring tape for each. I would have a 3/8 ratchet with a T-30 and T-40 socket available as well. There are a few spots where you’re driving lag screws and can’t get an impact driver around to get them.
– The instructions are pretty good, but you need to check, double check, and then check again that you have certain boards in the right spots. There are pilot holes for later construction steps that MUST be oriented the right way. Look at your lumber, look at the steps very closely, and double check. The shading on the instructions makes if very difficult to see where the holes need to be at times. I probably lost an hour total over the two days flipping boards here and there.
– Putting the slide together sucks. I’m sorry, there’s no other way to say it. Have help and take your time. Hanging it on the structure is one of your last steps so if you get frustrated, walk away and come back later. They have you put it together very early and then set it aside so as long as you don’t lose the hardware, you can come back to it later if needed.
– I think we had three boards that tried to split on us during construction. It would be a good idea to have some small 3/4″ outdoor screws handy to bring any splits back together. Overall, wood splitting was not a concern at all.
– Make sure the swing arm is level. The crows nest sits on top of it and needs to be level as well. We had to dig down about four inches at the end to make sure things were level. No big deal, but just make sure that side is square and true.
– We used level dry blocks (big rubber foot-pads) under the corners and the swing and monkey bar feet. I highly recommend you get some of them as well. They will make leveling a bit easier and allow you to trim/mow without beating the wood up (it is pretty soft cedar).
– The finish on the wood looked good but it will need soaked with a water seal product very shortly. I’m planning on doing that mid May prior to a short vacation so that it has time to soak in and cure before the kids are running all over it again.
tl;dr great set that my son and the neighbor kids already enjoy!
Two month update: the set has taken sun, lots of rain already, and even a hailstorm. It’s holding up very well. I noticed the finish starting to fade very slightly so I applied some Olympic premium sealer in clear from lowes – about $30 per gallon. Put it on with a garden sprayer and let it soak in for three days during a short time away. The wood took most all of it in readily and it looks great. Beads water like a sheet of plastic right now. I used 1.5 gallons to cover the whole thing. I’d highly recommend doing the same to any cedar outdoor set.
18 month update – the set is holding up really well. We even moved it to the other side of the yard to make room for a major backyard improvement. We un-anchored it, detached the ladder, rock wall, and slide, and the rolled it across the yard on 1 1/2 pc. Took 45 minutes to move it 120 feet and turn it 180. After we moved it, I went around and tightened anything loose. I’m convinced most of the negative reviews are from people who didn’t tighten things well enough. Looks great in it’s new home.
3yr Review – Just finished coating it with sealer and tightening everything up. This kit is holding up very well. We’ve even added things to it – a bucket and pulley, bell, steering wheel, drums, a periscope, and a metal wall to hang nerf guns with magnets glued on. My 6 and 2 year old love this kit, the neighbor kids love it, and my wife and I do not mind spending an afternoon a year sealing and tightening it all up. It still looks great.
Quick notes:
– I switched to a Valspar water based 6yr sealer this year. It darkens the finish a bit but it looks fantastic, goes on quick, and cleans up easier than the Olympic I used before.
– We put artificial turf in the sandbox area, under the swings, under the steps, slide landing area, and at the base of the rockwall. I would highly recommend this if you don’t have it surrounded by mulch. I acquired ours at Costco to the tune of about $2,50/sq foot and have it secured down with landscape fabric staples.