Celestron NexStar 130SLT Computerized Telescope


| Price history for Celestron - NexStar 130SLT Computerized Telescope - Compact and Portable - Newtonian Reflector Optical Design - SkyAlign Technology - Computerized Hand Control - 130mm Aperture | |
|---|---|
|
Latest updates:
|
|
Original price was: $639.95.$484.49Current price is: $484.49.
Celestron NexStar 130SLT Computerized Telescope Price comparison


Celestron NexStar 130SLT Computerized Telescope Price History
Price History for Celestron - NexStar 130SLT Computerized Telescope - Compact and Portable - Newtonian Reflector...
Statistics
| Current Price | $484.49 | January 8, 2025 |
| Highest Price | $581.54 | July 20, 2024 |
| Lowest Price | $484.49 | November 24, 2024 |
Last price changes
| $484.49 | November 24, 2024 |
| $521.54 | October 29, 2024 |
| $531.54 | October 27, 2024 |
| $501.54 | October 21, 2024 |
| $506.54 | October 20, 2024 |
Celestron NexStar 130SLT Computerized Telescope Description
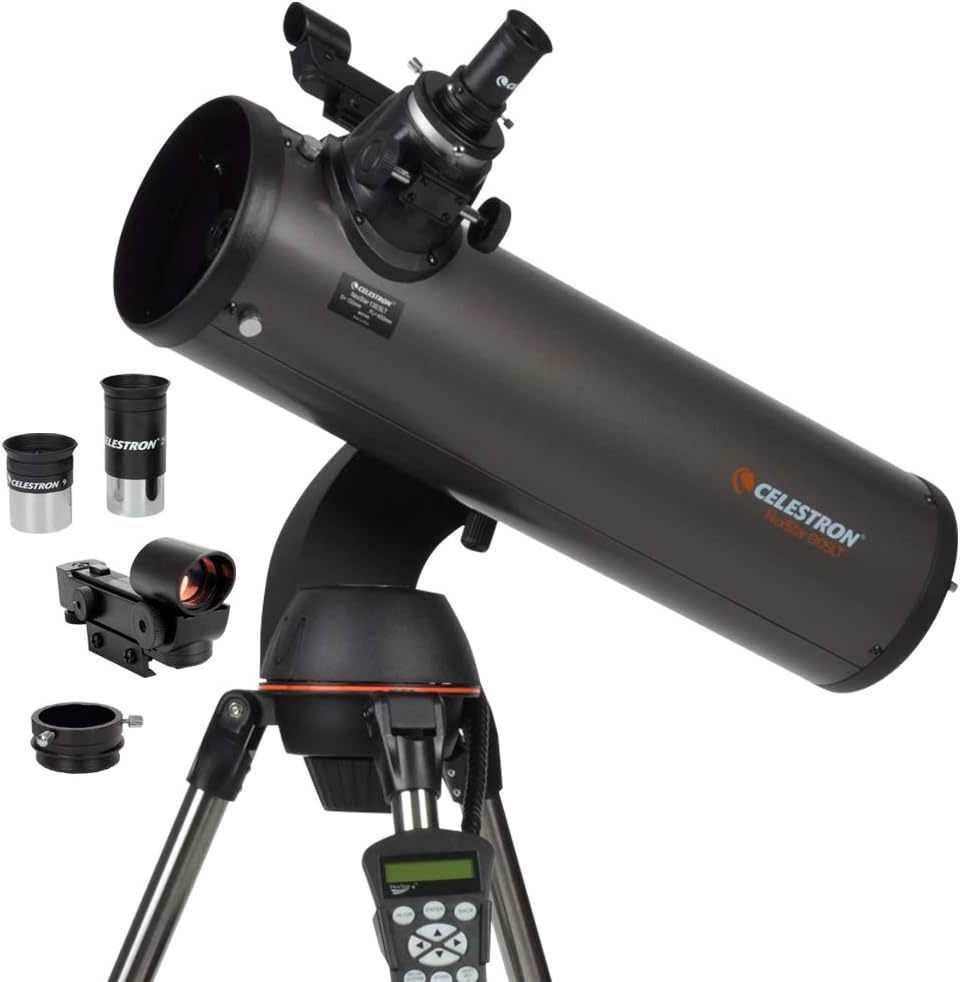
The Celestron NexStar 130SLT is a highly regarded computerized telescope that brings the wonders of the night sky within easy reach of both amateur and seasoned astronomers. With its innovative features and user-friendly design, this telescope stands out as a top choice for star gazing enthusiasts. Let’s dive into what makes the Celestron NexStar 130SLT a standout instrument.
Computerized Star Locating Telescope
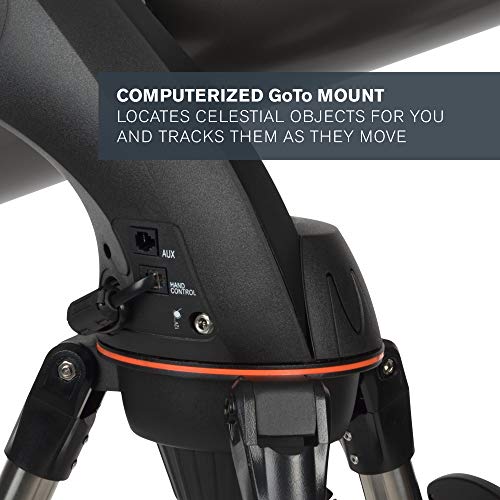
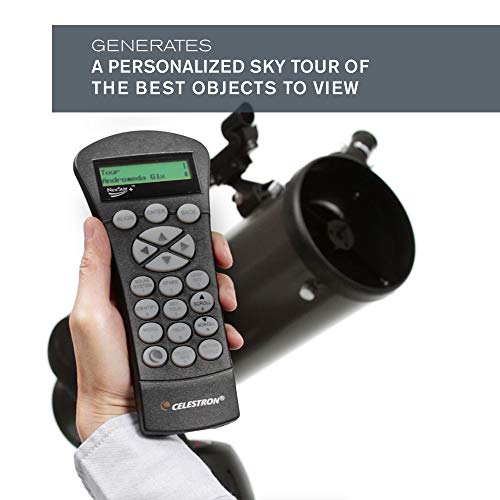
One of the most impressive features of the NexStar 130SLT is its computerized star locating system. The telescope boasts a database of over 40,000 celestial objects including stars, galaxies, and nebulae. Users simply select an object from the database, and the telescope automatically locates it in the night sky and tracks it as it moves. This feature is a game-changer for those new to astronomy, as it requires minimal manual input.
Newtonian Reflector Optical Design
The NexStar 130SLT employs a Newtonian Reflector optical design with a large 130mm aperture. This allows the telescope to gather substantial amounts of light, making it possible to see detailed views of our Solar System and beyond. Users can enjoy stunning views of Saturn’s rings, Jupiter’s cloud bands, the Moon’s craters, and the Orion Nebula.
Compact and Portable
This telescope is designed with portability in mind. It is compact, lightweight, and easy to transport, making it suitable for both adults and kids. Whether you plan to use it in your backyard, at a dark sky observing site, or your favorite campsite, the NexStar 130SLT is easy to set up and ready to go wherever your adventures take you.
Fast Setup with SkyAlign
Setting up the NexStar 130SLT is a breeze thanks to Celestron’s proprietary SkyAlign technology. This intuitive process has you ready to observe in minutes. Simply center any three bright objects in the eyepiece, and the telescope aligns itself to the night sky, ready to locate thousands of celestial objects for you.
Unbeatable Warranty & Support
When you purchase the NexStar 130SLT from an Authorized Dealer on Amazon, you receive a 2-Year US Warranty and unlimited support from Celestron’s team of US-based experts. With a legacy dating back to 1960, Celestron is a trusted name in the world of telescopes, ensuring you buy with confidence.
Bonus Free Starry Night Software
Included with your purchase is a free download of Starry Night Special Edition, one of the top-rated astronomy software programs. This software allows you to simulate the night sky, learn about celestial objects, and plan your observing sessions, enhancing your overall stargazing experience.
Product Specifications
- Product Dimensions: 28 x 12 x 8 inches
- Item Weight: 11.4 pounds
- Item Model Number: 31145
- Batteries: 1 Lithium Metal battery required (included)
- Date First Available: February 18, 2005
- Manufacturer: Celestron
- Language: English
- Country of Origin: China
The Celestron NexStar 130SLT is more than just a telescope; it’s a gateway to the cosmos. Its comprehensive features, ease of use, and reliable support make it an excellent investment for anyone interested in exploring the night sky.
Celestron NexStar 130SLT Computerized Telescope Specification
Specification: Celestron NexStar 130SLT Computerized Telescope
|
Celestron NexStar 130SLT Computerized Telescope Videos


Celestron NexStar 130SLT Computerized Telescope Reviews (9)
9 reviews for Celestron NexStar 130SLT Computerized Telescope
Only logged in customers who have purchased this product may leave a review.


Amazon Customer –
المنتج رائع ومثالي للفئه الهاوية للتبع الكواكب النجوم مع اخذ الاعتبار بامتلاك عدسات مناسبه اضافيه
Robert Johnson –
My wife bought this scope for me for Christmas. I had no experience with astronomy prior to that. It’s a little finicky to set up but once you do it correctly, it’ll work well. The image may not be exactly in the center but it should be close.
The eyepieces that come with it are just okay. They’re a step below kelner eyepieces (which is below Plossls). For eyepieces, use a low power eyepiece (25mm) to scan for objects. With eyepieces, the lower the number the higher the magnification. If you buy eyepieces, stick to good quality eyepieces in the 5mm to 35mm range. More magnification (35mm) will result in an exit pupil that is too large (makes it difficult to see without a moving black blob appearing in the eyepiece). Celestron X-Cel eyepieces would work well for this scope and aren’t too expensive. I like the Baader Hyperion as well. It gives a wide angle view and a large eyeglass with good eye relief to look through (great for eyeglass wearers). A x2 Barlow lens is a good option to pick up as well. Combined with your eyepieces, it doubles your available magnifications (9mm becomes a 4.5mm, 25mm becomes a 12.5mm). I have the Orion shorty x2 barlow.
Don’t bother with the eyepiece kits. The optics are too close together in strength so you’ll probably only use 3 of the 5. The color filters are pretty useless except for a moon filter. All you really need are 3 eyepieces a low power (no greater than 35mm), a medium power (14-18mm) and a high power (no less than 5mm).
You’ll need a collimator. With Newtonians, you’ll need to align the mirrors. It’s best if you check it each night before you use it. Moving the telescope can knock it out of wack. A collimator helps you line everything back up. I have the Orion laser collimator.
Here are some setup tips for setting up the scope for Goto use:
1. If you picked a city instead of entering a latitude longitude, and you don’t actually live in the middle of the city (you just picked the closest one), do a factory reset of the computer and choose latitude-longitude instead. It’s much more accurate. You can find the latitude longitude with a smart-phone app (e.g. Compass for Android) or by googling your address. You’ll need the lat long in degrees, minutes, seconds (not the digital version like -117.0101). It should look like W 117 15′ 12′
Sometimes a city selection is too broad. I am about 20-30 miles outside the city I chose and it makes a big difference when the scope is skewing.
2. Make sure you’re using the correct time/date settings including daylight savings time vs standard time. Use your cellphone time.
3. Instead of using 3-star align, use Auto-Two-Star align. It’ll require you to know the names of the stars but it’s much better. I use Google Skymap to find one of the stars in the list if I don’t know the name or the ones I do know are obscured. If you use the 3-star align, chose bright stars that are on opposite sides of the sky and not in a line (a triangle pattern is preferred). For example, if you just used the stars in Orion, that’s probably too small of an area of the sky. Choose one star in Orion (e.g. Betelgeuse), one in Gemini (e.g. Castor) and one in Cassiopeia.
4. When centering a star during alignment, defocus the star so it looks like a ball rather than a point of light. It’ll be much easier to get in in the center.
5. When centering on the final star try to move the scope in the same direction as it was moving when it skewed to the star you chose. So for example, if it was moving down and to the left when it stopped, position the scope so that when you get it in the center of the view that you are moving it down and to the left when you stop.
UPDATE 5/19/2016: I recently purchased a ZWO ASI185MC camera that I’m using with the 130SLT. The camera will easily come to focus when used in the 2″ adapter. It will come to focus in the 1.25″ adapter as well but it’s a little closer to max in-focus. I’m getting pretty good images with it doing short exposure (<15seconds) and stacking. You'll want to use a Bahtinov Mask to focus. I purchased an Orion Accufocus which greatly helps with focusing the image without everything shaking. Check my reviews for the correct items.
I also have it working with a computer (computer drives the scope). You need to install ASCOM drivers (6.2) and ASCOM drivers for the Celestron product line. Just search for “ASCOM drivers” on google. It’s not necessary but it’s nice for an all-in-one software package (Astrolive USB).
I added some pictures I took of M51, M57, Jupiter and the moon. These were taken from my front yard about 5 miles from the city. The deep space objects won’t appear that clear when viewing through the eyepiece (cameras pick up more light than our night vision does).
Update 6/28/2016:
One thing to really improve your goto results is to use “Precise Goto”. It’s undocumented in the manual. It’s accessed differently than a regular goto. Press the “Menu” button. Then use the up/down arrows (6 &9 key) to find “Precise Goto”. Then select “Database”. Finally, choose from the object list type using the up/down arrows (e.g. Messier, NGC, Named Objects). So for instance, if I choose “Messier” and then enter the number for the Messier Object (1-110). It will calculate and give you a list of 5 bright stars with #1 being closest to the object. Select 1. The scope will slew to where it thinks it is. Center the bright star with the red dot finder and look through your eyepiece to see if it’s centered there as well. Once it’s centered in the eyepiece, hit . The scope will slew to the object and there’s a good chance it will be centered in your eyepiece. I use this feature with my camera and it almost always gets it close to the field of view. You should easily find the object in the field of view of a 25mm eyepiece (though it may be faint and fuzzy).
Amazon Customer –
The installation is sooooo complicated. It’s been 6 months and I couldn’t do anything with this $1000 gadget. I later realized some parts are missing but now I’m in a phase where I can even return this item 🙁
Bryan –
Last week I received my NexStar 130 SLT. I made the decision to buy this scope based almost entirely on the recommendations of reviewers both here on Amazon and elsewhere. This is my first telescope, and I will say will say up front that I am completely happy with this scope! Regarding the negative reviews, I can sympathize that in some cases a truly defective article can arrive. For many, I would suspect that the issues encountered were largely of their own making. While in the main, this scope is relatively simple to set up and use, it still helps to have at least a modicum of technical skill (a healthy dose of common sense will help too!).
The evening I received the scope (15 July) I set it up on my deck. Yes, not the most stable of platform, but I live in a dense neighborhood with lots of obstructions and murderous light pollution. The star alignment, using the 3-star “Star Align” process, took me two attempts. I blame my ineptitude with the use of an eyepiece and not having stars truly centered in the field of view for this. Regarding this, I think an eyepiece with a crosshair would be excellent for performing these alignments. (Another night I had multiple failures. This turned out to be related to the incorrect time, which was off by a few hours. The system will apparently remember the last values you entered. Be advised, they will not update and will be incorrect. Check your time and date each time you power up the system! (Many complain that the system does not retain the time once it is entered. I would venture a guess here as to why. The simple truth is that it would drift off of “real” time within a very short matter of time. Maybe adding the optional GPS module would fix this problem, but the internal NexStar clock is simply freewheeling and will inevitably be off the longer it ran on its own. Having to re-enter it each time you power up ensures that time is not an issue during the alignment procedure. Imagine your frustration if you took tons of time aligning each star in your eyepiece, and despite your best efforts the system would not align? Re-entering the time alleviates this factor, assuming you enter it correctly!)
For my location, I simply plotted my deck in Google Earth and wrote down the coordinates. This seems to have enough fidelity for the star alignment to work.
Once I had the telescope aligned I picked a random bright object in the southern sky to examine. Imagine my surprise when the first celestial body I have ever viewed through a telescope turned out to be Saturn! Using the provided 9mm eyepiece, the rings were clearly visible. I had not yet received my collimation eyepiece, so I was worried that it might need an adjustment. No adjustment necessary on my scope at this time! I am looking forward to viewing through higher-quality optics though.
Regarding the stability issues that many have commented about. Yes, images do move about quite easily, especially on my wooden deck. I have not yet weighted the tripod or gotten a set of the damping pads. I will say that image stabilization is not completely unbearable on my scope. In just a couple of seconds after making a focusing or alignment adjustment, images became still enough to view nicely. I can only imagine this will improve with weights and dampers. I do see why this scope would not be ideal for astrophotograpy though. I would think it would not be impossible, but you would have to ensure the scope is deployed on a solid foundation and go to great lengths not to disturb the scope in any way.
I was able to configure and control my scope with Celestron’s enclosed NexStar Observer List (NSOL) software and the freeware Stellarium packages relatively painlessly. Install the drivers that come with your USB-to-Serial Port adapter. (The computer interface to the NexStar handset requires a serial RJ-11 phone jack. Celestron sells a cable with an RJ-11 phone connector on one end and computer 9-pin RS-232 serial port connector on the other. Most likely your computer/laptop will not have a serial port, so you will have to further adapt this to USB) My laptop configured the COM3 serial port, but your mileage may vary depending on your system. Make sure to restart your computer once the drivers are installed. Truth in advertising, I tested my scope indoors using an arbitrary alignment. The scope tracked and moved what seemed to be the proper azimuths and elevations for the objects I selected in the software. Any issues I find in the wild once I get the scope outside again can likely be mitigated with the anti-backlash settings for the motor drive. If there is anything significant I find, I’ll make an update!
Regarding some of the slewing, anti-backlash, and cord wrap settings, I would have appreciated a little more information in the manual as to what the settings actually do and how they work. I did see an example where my scope attempted to go the long way around counterclockwise to a position that just should have been about 10 degrees clockwise. This was very likely due to bad settings in the aforementioned utilities. I made a few tweaks after that and the problem seems to be alleviated, though I am not exactly sure which setting did the trick! 🙂
At the end of the day, I have to say that for the money, this scope does everything it is intended to do. Have some realistic expectations going in. You are not going to get Hubble Space Telescope views out of this scope! But you will get a lot of enjoyment out of it if you take the time to set it up and align it properly. I did get a good view of a deep space galaxy, which as many have stated, was simply a distant smudge of stars. However, it was clearly visible amongst the background of distinct stars.
Joshua Ehrhardt –
I’ve always wanted a ‘quality’ telescope,
given my lack of knowledge and experience with locating sky objects,
I really wanted one w/ a ‘goto’ tripod and a computer interface.
This telescope fit my needs and budget, especially on ‘prime day’,
so I bought it.
I’m extremely impressed with the telescope, I can see quite a few deep sky objects, which is what I’m mainly interested in.
Pros:
– Easy assembly, self explanatory really.
– The packaging was amazing, there is very little chance this telescope was going to suffer any shipping
damage.
– The auto 2 star alignment works very well, it’s pretty cool how it just locks on pretty much any star/planet/deep sky object.
– The computer interface just works with ‘Starry night’ software, you do need to align the telescope prior to connecting.
Cons:
– The tripod is a bit shaky and lighter duty than I would of thought.
– I could never get the 3 star align to work, but the auto 2 star align works for me every time.
– It takes 8 batteries plus the laser LED battery in the finder scope, so I run it off a wall wart, which you buy separately.
– The hand control is a bit cumbersome, I have a hard time using it in the dark.
– For me, the tracking accuracy does deteriorate over time, so after an hour or so, I find a re-alignment is in order.
– I do wish it auto realigned based on the manual adjustments you do when tracking an object,
(maybe it does and I just don’t know how to do it)
Overall, I would definitely recommend this telescope, especially to beginners like me.
John Haughey –
Bought one for myself, it is amazing, seeing the rings of Saturn or the moons of Jupiter, Still need to do the final set up, going to take it to the space/science center to get some professional help with the auto tracking system, was there for the initial set up and they were amazed at how good this telescope is, hint, by the extra lenses and filters especially if looking at the moon, very bright but amazing.
NooFa –
Packaging was good.
Received a new piece.
Working superb.
Aakash singh –
El telescopio llegó antes, completo y bien empacado. Después de probarlo he verificado que funciona perfectamente. Recomiendo que compren además algunos oculares adicionales, filtros y muy importante, una herramienta de colimación. Para mayor rapidez y comodidad compren un colimador láser. Es muy probable que los espejos lleguen desajustados por el viaje hasta nuestro hogar y es indispensable hacer los ajustes en la óptica. Esto es parte del mantenimiento cotidiano de los telescopios reflectores. Creo que es ideal para principiantes e intermedios, sobre todo valoro las funciones de auto tracking para seguir los objetos y no tener que estar ajustando la orientación del tubo a cada momento. En las primeras de cambio, pude ver Júpiter y sus lunas, distinguiendo las bandas y también Saturno distinguiendo los anillos. Ojo: no esperen ver en el ocular una foto de revista astronómica; hay que tener las expectativas correctas y aún así la experiencia es sobrecogedora. No olvidar que el telescopio viene con oculares de 9 y 25 mm que les darán aumentos 72x y 26x respectivamente. Suficiente para planetaria y cielo profundo sin grandes pretensiones. Compren igualmente una Barlow 2x y 3x para aumentar las posibilidades de enfoques más potentes y sobre todo serán útiles si quieren hacer astrofotografía. Yo compré anillo T y adapté sin problemas mi cámara DSLR con ayuda de la Barlow para lograr enfoque y saqué algunas Buenas fotos de la Luna. Quiero mencionar que después de pasar mucho tiempo investigando cuál podría ser mi mejor opción, me decidí por esta joya porque es un f/5 muy luminoso, sirve para cielos profundo perfecto y un poco de planetaria. Además tiene sistema GOTO y auto tracking lo que te facilita la vida buscando objetos y manteniéndolos en foco todo el tiempo. El soporte tiene adaptador cola de milano por si quieres montar otro tubo. Optaré por comprar después un MAK para ver planetaria de forma más poderosa. En resumen, un telescopio muy recomendable.
Robert Johnson –
The motors are really nice to have for adjustments! It is made of good quality materials, and the tripod is sturdy enough for this model. Very good so far!