FLASHFORGE Adventurer 5M High-Speed 3D Printer
Set Lowest Price Alert
×
Notify me, when price drops
Set Alert for Product: Flashforge Adventurer 3 Pro 3D Printer with Auto Leveling and Camera, Print Size 5.9 x 5.9 x 5.9'' - $219.00
Last Amazon price update was: January 7, 2025 14:12
×
Product prices and availability are accurate as of the date/time indicated and are subject to change. Any price and availability information displayed on Amazon.com (Amazon.in, Amazon.co.uk, Amazon.de, etc) at the time of purchase will apply to the purchase of this product.
FLASHFORGE Adventurer 5M High-Speed 3D Printer
Original price was: $399.00.$219.00Current price is: $219.00.
FLASHFORGE Adventurer 5M High-Speed 3D Printer Price comparison
FLASHFORGE Adventurer 5M High-Speed 3D Printer Price History
Price History for 【Refurbished】Flashforge Adventurer 3 3D Printer Fully Enclosed HD Camera WiFi
Statistics
| Current Price | $147.60 | January 9, 2025 |
| Highest Price | $369.00 | August 6, 2024 |
| Lowest Price | $147.60 | December 17, 2024 |
Since August 6, 2024
Last price changes
| $147.60 | December 17, 2024 |
| $258.30 | October 21, 2024 |
| $369.00 | October 18, 2024 |
| $258.30 | August 9, 2024 |
| $369.00 | August 6, 2024 |
FLASHFORGE Adventurer 5M High-Speed 3D Printer Description
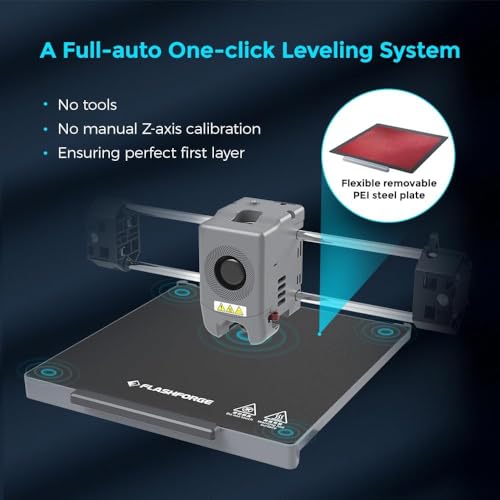
- ✅ 【One-Click Automatic Printing】 -Experience the future of 3D printing with the Adventurer 5M Series. Ensure impeccable bed leveling every time you print, without the need for manual adjustments. Effortlessly achieve consistent adhesion and flawless first layers, saving time and eliminating frustration.
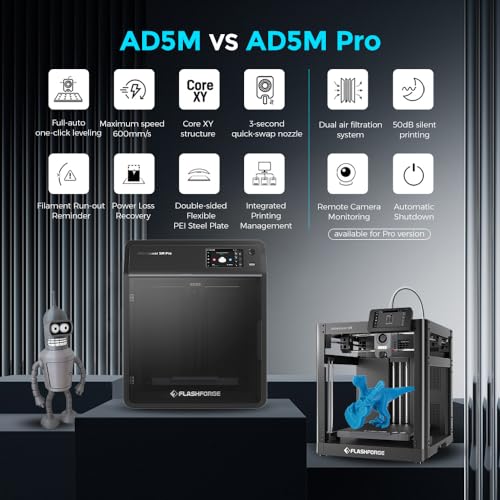
- ✅ 【12X Ultra Fast Printing 】 -The AD5M uses a Core XY structure, with a travel speed of 600mm/s and 20000mm/s² acceleration. Its unique lightweight design and stability boost efficiency, reduce production cycles, and ensure high precision and quality, ideal for rapid prototyping and mass production.
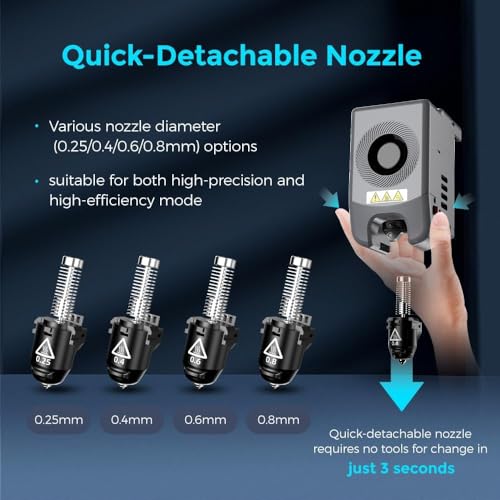
- ✅ 【Your Smart Choice】 -Offers rapid nozzle changes in 3 seconds, a high-flow 32mm³/s nozzle for stable high-speed printing With a quick 35-second warm-up to 200°C, dual-sided PEI platform for easy removal, and multiple platform options, it’s a smart and efficient choice for creative projects.
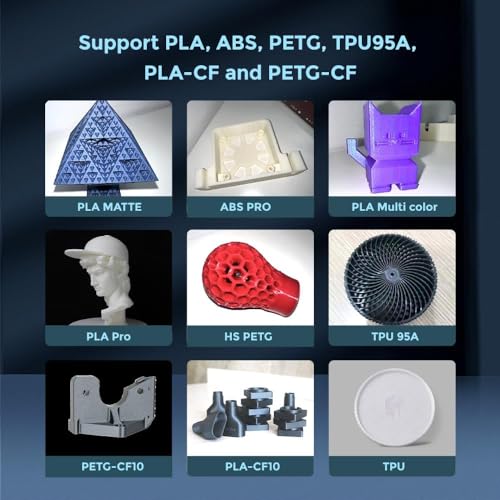
- ✅ 【Superior Print Quality and Adaptability】 -Dual-fan nozzles, vibration compensation, multiple nozzle sizes (0.25, 0.4, 0.6, 0.8mm), and a 280°C direct extruder cater to various materials. From intricate details to rapid prototypes, superior results are guaranteed.
- ✅ 【Real-time APP Monitoring 】-It also supports the use of a mobile app-Flash Maker, allowing for remote real-time monitoring of print progress, adjustment of parameters, receiving message alerts, and other functionalities. These features enable intelligent operation, ensuring seamless and uninterrupted printing.
FLASHFORGE Adventurer 5M High-Speed 3D Printer Specification
Specification: FLASHFORGE Adventurer 5M High-Speed 3D Printer
|
FLASHFORGE Adventurer 5M High-Speed 3D Printer Reviews (8)
8 reviews for FLASHFORGE Adventurer 5M High-Speed 3D Printer
Show all
Most Helpful
Highest Rating
Lowest Rating
Only logged in customers who have purchased this product may leave a review.



marine gandemer –
Choisi pour son caractère “plug & play”, je n’ai pas été déçu de ce côté là. Simplement branchée puis étalonnée facilement (l’imprimante prend 9 points sur la plateforme que l’utilisateur doit ajuster via l’écran tactile. Personnellement j’ai étalonné à l’aide d’une feuille de papier : elle doit toucher la tête d’impression mais quand même pouvoir glisser sur la plateforme). J’ai de suite fait imprimer le modèle de cube déjà présent dans la mémoire. J’ai été agréablement surpris du résultat, aussi bien que l’on est en droit de l’attendre d’une imprimante 3D filaire bien réglée.
Après quelques essais, l’impression a l’air fiable, sur les petites pièces que j’ai imprimé jusqu’à présent. Ce qui nous amène à la petite contrainte de ce modèle : elle ne peut imprimer que des pièces de 150x150x150 mm. Ce n’est pas forcément gênant (en tout cas ça ne l’est pas pour moi – je l’ai achetée en connaissance de cause) mais à prendre en compte.
En revanche, la chauffe est très rapide, l’imprimante est assez silencieuse (pour une imprimante 3D), si ce n’est ces horribles bips au démarrage de l’imprimante et à la fin d’une impression, qui heureusement sont désactivables via le menu.
Autre petit défaut, l’imprimante n’a jamais réussi à se connecter à mon réseau wifi (mais mon code wifi compliqué en est peut être la cause), donc je l’ai branchée en filaire.
Enfin, le logiciel d’impression 3D dédié FlashPrint est tout à fait suffisant, il est assez intuitif. Il permet peut être un peu moins de finesse de réglage que d’autres logiciels, mais ceux-ci sont alors plus complexes. A choisir en fonction des besoins. Je veux quelque chose de “plug & play” donc FlashPrint me convient. Et avec FlashPrint, l’envoi d’impression 3D via le réseau est a priori fiable et rapide.
Cette imprimante répond globalement à mes attentes, je la recommande donc à ceux qui comme moi sont novices dans le milieu de l’impression 3D. Au final, la seule condition pour l’acquérir est de savoir dessiner en 3D… élémentaire, mais il convient de le rappeler tout de même.
TechHead –
The media could not be loaded.
This is my first venture into 3D printing and thanks to the Flashforge Adventurer 3 i am well and truly hooked!
My brother is massively into 3D printing and i have asked him to print me some items in the past, he suggested i looked at buying myself one, but to be honest, whilst i am very good at new tech, 3D printing looked way too complicated for even me!
Whilst browsing the Amazon daily deals i came across this printer, reading the reviews and watching a few online videos everyone seemed to be saying this device required very little knowledge and just kind of worked straight out of the box – i decided to take the plunge and ordered!
When the printer arrived i was immediately super impressed by the build quality of the device and the super smart appearance of the machine. I looked at the instructions included and to be honest they were beyond pointless! I therefore watched a setup video online and hooked up the device. To my amazement it really was just plug and play! I had to download the flashprint 5 software which is free from the manufacturers website – again there is no real instructions on how to use this software but online videos helped me through it and it actually was pretty simple!
The printer comes with a small test roll of 250g PLA filament in red. Loading the filament was super easy, just place the roll inside the machine, feed the end into the printer and use the touch screen to pull the filament through. The touch screen guides you through the whole process.
I was now ready for my first 3D print – Super Excited! I downloaded a couple of free .STL files and loaded them into Flashprint, clicked a couple of buttons and it send the file to the printer. The display on the printer sprung to life and informed me it was receiving the file, it then displayed a nice 3D image of the item i was printing – which was a Benchy (tug boat). The print took around 1hr 30 mins but WOW – how good did this little boat look!!! That’s it i was hooked!! I ordered some more filament in black from Amazon and my next project was a skull that could hold pens/pencils. That has now been printing for around 8hrs and has around 3hrs left – so yes it’s not a fast process – the machine takes it time, but the detail is just so amazing!
What i love about the machine is that it is super quiet, it does not smell when printing, the print area is fully enclosed, touch screen is great, footprint is nice and compact, internal lights make checking on your print really easy, heat up time is astonishingly fast! Biggest plus is that it really is plug and play with no 3D printing knowledge needed!
What i didn’t like so much about the machine was, camera is pretty poor quality – you also can not view this in the slicing software but instead have to go to the printers IP address to view – it’s good enough for you to check on your print but it’s quite dark and lacking in detail, the quality looks like VGA rather than 720p. The printer can also only house 500g reels of filament, which are not value for money compared to larger 1kg rolls, however you can easily solve this buy purchasing a filament holder and having your PLA on the outside of the machine. The print bed is fairly small allowing a max of 150mmx150mmx150mm prints – but for a beginners machine i feel that size print is fine for an introduction into the world of 3D printing.
In summary, if you are looking at getting into 3D printing then i very highly recommend you look at investing in the Flashforge Adventurer 3 machine – you honestly can not go wrong with this smart looking device! It is truly is ideal for a novice/beginner who has extremely limited knowledge of this daunting hobby. If you are a more experienced 3D printer then you may want to look elsewhere as this machine is pretty locked down in terms of firmware and customisation options.
A truly amazing 3D Printer – i am totally in love with this device! I know for a fact i will be upgrading in the future and getting another machine that can perhaps print a little faster and have a larger print area. I will definitely consider getting another larger flashforge printer as i am super impressed with their product.
I can not recommend this enough!!! Over the Moon with it!
I hope that you found my review helpful
Scott Daniels –
This review is for the 5M model, not the Pro model, but they are very similar and a big plus is the ease with which this can be upgraded by the user to the Pro version. It is fully on par with similar offerings from Bambu Labs and Creality. TL;DR – There is no printer less than $600 that I would recommend. This printer is fast, extremely accurate, and trouble-free.
Pros:
* Blazing fast – about 4 times faster than my Ender5
* Extremely accurate. This is my 4th 3D Printer and the first one that passes various tolerance tests without a lot of tweaking (not that I was ever able to fully get there with other printers). This one passed the nickel test as well as the Tolerance Coin without any tweaks at all.
* Plug and play. Only unpacking and plugging in the display, followed by automatic calibration.
* Absolutely perfect bed leveling and adhesion. Supposedly application of a glue stick is required for PLA, but I have zero problems across the bed. Parts do pop off at the slightest touch when done, but so far have not come loose during printing. Perhaps taller parts may have problems that required either a gluestick or another bed plate material.
* Perfect configuration for OrcaSlicer which is a good choice.
* LCD display is easy to read, easy to use, and intuitive.
Cons:
* It is very loud. Part of it has to do with the high print speed. However, some optimization of fan noise should be investigated. Every online review I have seen speaks of the noise from the motherboard cooling fan when not printing. I do not find that noise to be that bad. What is bad is the two fans for the hotend. One is to cool the hotend and the other is to cool the part when printing PLA. I suspect both the choice of fans as well as excessive shrouding by the plastic enclosure are major contributors. UPDATE: the worst of the noise is actually from the motors and/or motion. This may be part of the high-speed nature.
* No wifi support except for their own slicer (which is junk). At this writing, a fork of Orca supposedly supports wifi uploading. Also missing are various Klipper Web UIs. A fix for this may also be in the mix.
UPDATE: Wifi is now supported. I can send prints directly from OrcaSlicer now.
General UPDATE:
After owning the printer for a few months now, and 300 hours of usage, I have upgraded my rating to 5 stars. This printer at $300 to $350 is the absolute best value and extremely reliable. No fussing is necessary to get good results.
Recommendations to users:
1. I started having adhesion problems, and the supplied glue stick was worse than no glue stick. I heard that buffing the surface with ScotchBrite pad would fix it, and it did. No glue stick or anything is needed now. Adhesion is great with both PLA & PETG. I also bumped up the heated bed temps to 60 & 70 deg respectively.
2. I found I needed to print PETG at a much higher temperature – 265 degrees in order to maintain a glossy finish (which indicates the correct temp).
3. Print out the spool holder for the upgrade – it makes filament changing much easier.
4. You can add a camera from Flashforge (I did, but haven’t installed it yet).
5. A nice upgrade would be a 2nd spool holder (or make the upgraded one into a dual holder) to make color swapping easier. If you don’t need the run-out sensor for the 2nd color, just bypass the entire Bowden tube assembly and feed straight into the extruder.
6. For color changes, add M25 to the Change Filament G-Code in OrcaSlicer, then check the Manual Filament Change box under the MultiMaterial Tab (it took me a while to figure that out) in order to prevent the printer from pausing at the start of the print when a color change is inserted.
Suggestions to Flashforge:
1. Fix the fan noise for the hotend and motor/motion noise. I am not sure if an upgrade can be made available to existing customers, but that would be nice if you can fix this problem.
2. Incorporate Klipper WebUI into the regular firmware (that can be upgraded OTA).
3. Provide replacement nozzle tips in addition to the current all-in-one nozzle. It would be nice to be able to replace this inexpensive part when needed without buying an entire new nozzle.
4. To the printer screen, add the time remaining and the current layer.
5. Add a filament swapping system. Even a simple two-filament system would be great.
Serious Buyer –
***UPDATE***
Ok, I gave Flash Forge a second chance and I got another Adventurer 5M Pro. The features that made me get a second Adventurer 5M Pro were the filters (HEPA for UFPs and Active Carbon for VOCs) to me that was the most important feature to get a 3D printer for health reasons and then obviously the speed.
The Adventurer 5M Pro had both of the features I wanted (Filtration and Speed). I am a little bit confused with how the filtration system (very important to me) works because there is none of that in the User Guide. Also, the UFP (Ultra fine particles) emitted by the printer could be PM 1.0 which are way smaller than what the included HEPA PM 2.5 filter can capture (unless i am proven wrong). So with that in mind… is this printer delivering on the filtration system they are marketing much? You be the judge but at the same time don’t be fool by the feature descriptions that could be misleading. One last thing, the doors on the printer do not shut tight…UFPs and VOCs can leak out.
This time the box came good with the two handles intact. I was able to open the box and set up the Adventurer 5M Pro in a breeze seriously (around 10 minutes – second time around). The auto setup screen did not appear but I was able to get it going by reseting the machine to factory settings from the screen menu (not a big deal, easy) and it worked.
I followed the on screen instructions and everything worked great. I had no issues with the feeding of the filament or anything else. I decided not to print any of the models in the machine instead i designed a quick box for my tools in Tinkercad.com 3D designs and I saved the .STL file to my computer and opened it with the Flash Print 5 app provided by Flash Forge .
I then connected the Adventurer 5M Pro to the wifi and transferred the .STL file from my computer using the Flash Print 5 app. It worked like a charm. No issues with the internet connection. If the Adventurer 5M Pro goes to sleep, just disconnect it and connect it again to your WIFI connection (In Flash Print app) and you are ready to go.
Since I got the new machine, I have been printing at least 2 to 3 prints of 30 mins -1:30 Hours for several days and I haven’t had any issues ( I will update this post if I run into something). Right now the Adventurer 5M Pro just prints fast and to me the prints look really good (i was impressed). I ran into some lifted corners (warping) issues in one of my prints but that was my issue I did not do a raft or brim to make sure the model had no issues.
Now, this is my feedback for the technical support. Yes they have no calling number yet but they reached out to me as soon as possible. They helped me with the first Adventurer 5M Pro return and were quick to respond via messages (they do take a day since they are in a different time zone) for any questions I had. Thank you.
I have changed my review to 5 stars because I have had a great user experience from the second device (Adventure 5M Pro) and great tech support where my questions were answered. Overall experience Great!
——-Original Comment Below —————————————
Box came missing one handle, you can see the printer. I pre read the manual before the printer showed up. Once i had it home, i follow the instructions on the screen. First issue, the tools provided are not the best quality tiny tools. it took me 2 minutes just to install the filament holder, then it took about 4 minutes to remove the screws inside the printer.
I followed the on screen instructions and here is where my issues started. First i did the calibration and worked fine, then i clicked back because i did not want to install the filament. The machine went crazy, the head started moving in many directions and it gave me an an error on the xis.
Ok it stopped on its own but a piece of plastic came off broken (don’t know from where) i then turned it off. Left and came back and did a filament feeding, i followed the instructions on the screen and for some reason the machine was making a noise like trying to pull in the filament but it couldn’t.
I went online and see what i can do. I found Flash Forge support videos and they suggested to unclog the machine. So with the tools they provided and the video i tried but failed. In the video they ask you to unscrew a screw on the side of the extruder but guess what, the screw did not want to unscrewed with the tools they provided.
I started to look for support (maybe a number i can call)… well, there is no number to call and there is little info for this printer (for support) on their website and on the internet. So i believe than 10 minutes became 10 hours and now i have a machine that does not work, came with the box ripped from the handle, does not want to extrude, a screw that is stripped and a piece of plastic that came off somewhere. I am now returning this printer because of these issues.
David –
The media could not be loaded.
J’ai littéralement aucune compétences en machine 3d d’où l’achat de cette machine clef en main et je regrette rien ♡.
Et j’adore instalation en 5 minutes, parametrage 2 et impression du petit cub rouge de test 10 min après le déballage.
Elle est silencieuse pour une machine 3d (comparaison au grosse ouverte) on entend seulement les ventilateur pour le refroidissement = bruit d’un pc poussiéreux ^^.
Elle a une jolie qualité de finition de pièces
et un bon rendu qui peut être amélioré en diminuant la vite est autre technique (voir bateau).
Les pièces qui sont changeable sont pas chères et au nombre de deux seulement ^^.
Le plateau est en vente sur Amazon pour 15-20€ . Pour pouvoir enchaîner les impressions rapidement et la tête d’imprimante est aussi sur Amazon à 30€ . Donc rien avoir avec les DIY ou il faut des tonnes de pièces pour maintenir ça machine et excessivement chère .
Attention la zone d’impression est de 15cm x15cm donc reste petit mais on peut couper les impressions :).
En résumé, elle est pas chère et sans réglage donc parfait pour les foyers voulant une machine et bloquant sur le prix ou sur l’installation/maintenance. Et protège avec ca boite pour éviter au enfant de ce faire mal.
Je vous la recommande donc à 300%.
marine gandemer –
Aperta, accesa e subito ha stampato alla grande. Adesione sempre perfetta, definizione alta, con PLA ripiano a 55 gradi e filamento a 210 gradi stampa tutto alla perfezione senza sbavature!
TOP!!!
ß² –
Pros:
* Well packaged and setup was a breeze
* You can have it running and printing in 15 minutes or less.
* Initial setup is intuitive and easy to follow.
* Has a small amount of filament included
* Menu system is very user friendly and intuitive
* Easy to service and change nozzles and components.
Cons:
* Flashprint slicing software is underwhelming. Recommend using the Orca-Flashforge software instead.
* Filament spool holder is really designed for 500g spools and is on the rear. It’s an awkward location that many people may find unusable in their application. Recommend either printing a side spool holder (free files on flashforge’s site) or using some kind of 3rd party spool holder and moving the spool to the side.
* Firmware updates seem to cause issues with wifi connection settings. Hardline ethernet doesn’t seem to have the same issue.
This is a great printer for beginner to intermediate 3D printers. It’s simple to set up and get printing, and because you can connect it to your network, you can house the machine anywhere you can get a signal. While not silent, it is fairly quiet and there are enclosure options available to help with noise and fumes (depending on what/where you are printing) it is a competitive machine at it’s price point and with the ability to use multiple nozzles and print with a variety of filaments, it is quite a versatile machine.
TechHead –
Muy buena impresora aunque hay que conocer el producto que se adquiere. Es una impresora cerrada y sencilla centrada en la conectividad y en poder imprimir con gran facilidad sin tener que destinar tiempo en montaje, calibración y ajustes.
Ahí os dejo una recopilación de mis impresiones:
PROS:
– Plug and play. No tardas ni 5 minutos desde que la sacas de la caja hasta que puedes comenzar a imprimir la prueba.
– Buena calidad de impresión tanto en PLA como en ABS. Aunque no es super rápida, tienen una velocidad correcta.
– Rápido nivelado en 9 puntos.
– Es cerrada, con lo que eliminamos corrientes de aire y mejoramos la temperatura ambiental de impresión (Importante para el ABS)
– Muy buena conectividad, aunque con algunos problemas en el uso.
CONTRAS:
– Reducido volumen de impresión: 150x150x150 mm
– Solo acepta en el soporte bobinas de 250g o 500g, las cuales tienen un mayor precio/gramo, aunque se pueden encontrar fácilmente soluciones a este problema
– Software cerrado de Slicing, aunque funciona muy bien y ofrece suficientes opciones de configuración
– IMPORTANTE: No admite entrada por USB con la Cámara encendida, por lo que hay que apagarla en el menú de ajustes para poder añadir archivos por USB. Parece una limitación de Hardware.
– Cámara tiene, pero con una calidad bastante justita. Sirve para ver que todo va bien y ya, pero por el precio que tiene es algo más que comprensible.