Thermaltake V250 ARGB ATX Mid-Tower Chassis CA-1Q5-00M1WN-00
Set Lowest Price Alert
×
Notify me, when price drops
Set Alert for Product: Thermaltake V Series V250 TG ARGB - Tower - ATX - windowed side panel (tempered glass) - no power supply (PS/2) - black - USB/Audio - $88.49
Last Amazon price update was: January 9, 2025 18:33
×
Product prices and availability are accurate as of the date/time indicated and are subject to change. Any price and availability information displayed on Amazon.com (Amazon.in, Amazon.co.uk, Amazon.de, etc) at the time of purchase will apply to the purchase of this product.
Thermaltake V250 ARGB ATX Mid-Tower Chassis CA-1Q5-00M1WN-00
$88.49
Thermaltake V250 ARGB ATX Mid-Tower Chassis CA-1Q5-00M1WN-00 Price comparison
Thermaltake V250 ARGB ATX Mid-Tower Chassis CA-1Q5-00M1WN-00 Price History
Price History for Thermaltake V Series V250 TG ARGB - Tower - ATX - windowed side panel (tempered glass) - no power...
Statistics
| Current Price | $88.49 | January 10, 2025 |
| Highest Price | $88.49 | November 9, 2024 |
| Lowest Price | $79.99 | October 20, 2024 |
Since October 20, 2024
Last price changes
| $88.49 | November 9, 2024 |
| $79.99 | October 20, 2024 |
Thermaltake V250 ARGB ATX Mid-Tower Chassis CA-1Q5-00M1WN-00 Description
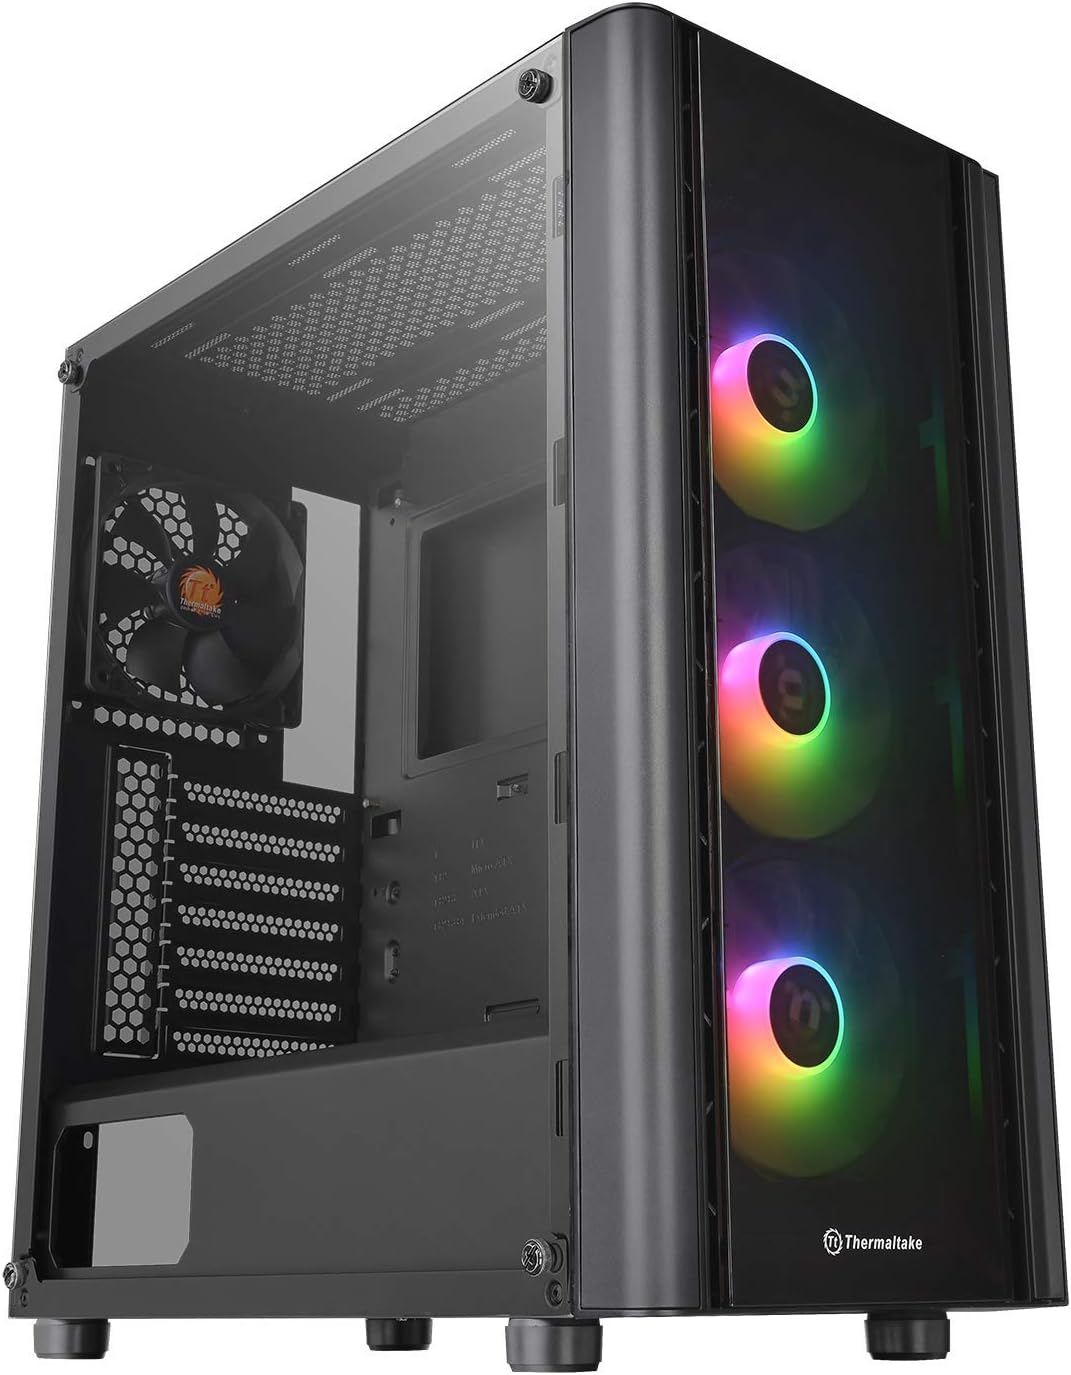
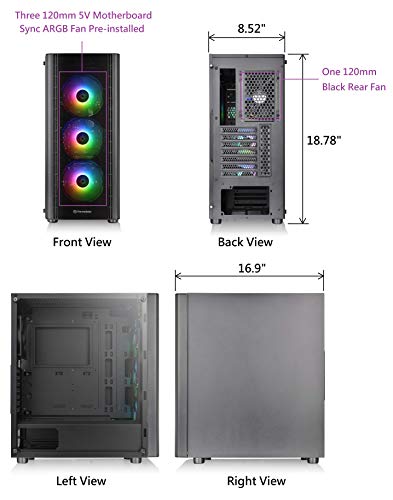
- [LIGHT UP THE SYSTEM] – 3 Pre-installed 120 millimeter 5V Motherboard Sync ARGB fans (Sync with ASUS, Gigabyte, MSI, ASRock, Biostar that has 5V addressable RGB header)
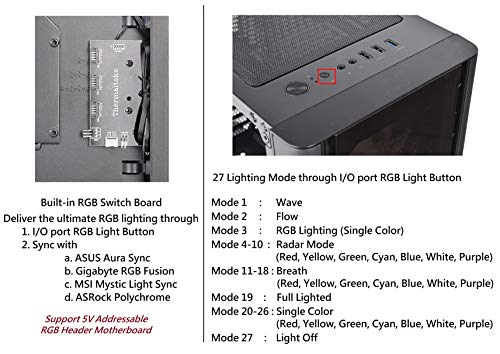
- [BUILT-IN DUAL MODE 5V ARGB SWITCH BOARD] – Control light via the I/O port button (27 LED modes/7 Colors) or via 5V ARGB Sync motherboard RBG software
- [27 LED MODES via I/O PORT] – Wave mode/ Flow mode/ RGB lighting (single color) / Radar mode (Red, yellow green Cyan blue White Purple) / Breath mode (8 Colors) / Full Lighted mode/ Single Color mode (7 Colors) / Light Off
- [CLEAR VIEW OF PC GAMING] – 4 millimeter thick Tempered Glass Side panel with standard mounting
- [FULL LENGTH PSU COVER] – Providing plenty of space to tuck away cables, while keeping airflow clear for your hard drives and PSU
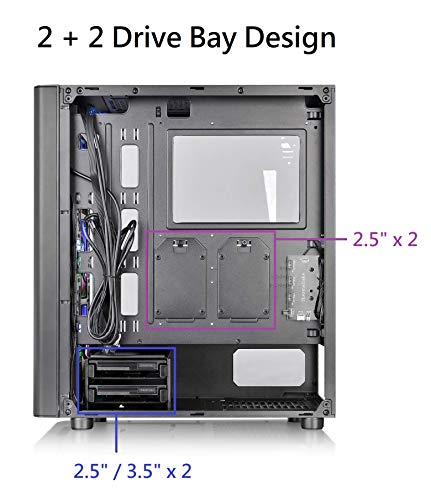
- [DRIVE BAYS] – 3 x 2. 5″ plus 2 x 2. 5″/3. 5″
- Supports Mini ITX, Micro ATX, and ATX motherboard
- [I/O PORT] – USB 3. 0 x 1, USB 2. 0 x 2, HD Audio x 1, RGB Light button x 1
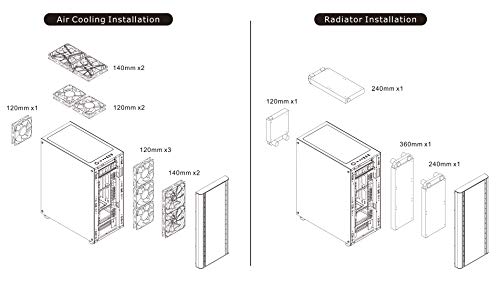
- [OUTSTANDING EXPANDABILITY] – 7 Expansion Slot / Max CPU Cooler Height: 160 millimeter / Max VGA Length: 320 millimeter / Max PSU Length: 160 millimeter (with HDD Rack), 200 millimeter (without HDD Rack)
- Dimension: 16. 9″ (H) x 8. 52″ (W) X 18.78″ (D) / 13.36 pounds
Thermaltake V250 ARGB ATX Mid-Tower Chassis CA-1Q5-00M1WN-00 Specification
Specification: Thermaltake V250 ARGB ATX Mid-Tower Chassis CA-1Q5-00M1WN-00
|
Thermaltake V250 ARGB ATX Mid-Tower Chassis CA-1Q5-00M1WN-00 Reviews (10)
10 reviews for Thermaltake V250 ARGB ATX Mid-Tower Chassis CA-1Q5-00M1WN-00
Show all
Most Helpful
Highest Rating
Lowest Rating
Only logged in customers who have purchased this product may leave a review.



Richard G –
I initially looked past this case when ordering the components for my new build. I’m not a big fan of all the RGB stuff. When my other case showed up in unusable condition, I ordered this one because it had overnight shipping on it. This case arrived and I was very happy with the quality. There are plenty of openings to pass cables and plenty of tie downs for cable management. As I said before, I dont like a lot of RGB, so I just turned it off. For those of you that like the flashy lights, this case has an RGB control module on it that will allow RGB control from your mobo. Mine came with the reset button cable hooked to the controller, so RGB is controlled with that button. The directions are good about telling you the different options for the ARGB.
Jeremy Olson –
This product is one of my favourite purchases ever. The aesthetic of the case is very nice, and the glass panel is high quality. By far my favourite part, however which is above and beyond my expectations was the way the fans and RGB are layed out. All of the connectors were already plugged into a microcontroller, leaving my motherboard free from unnecessary cables and leaving space for more fan slots. Needless to say I was pleasantly surprised after seeing that. So far, I love the case.
Jay bryant –
Versatil, gran ventana, trae integrado el modulo RGB con 3 ventiladores que le dan un look gamer de super lujo
Tomas –
Los fans del gabinete lucen mega cool. Trae varias piezas de sobra así que no sufrirás porque vas justo de tornillos o porque te faltó X o Y pieza. Tiene excelente espacio para el Power Supply. Tiene como dos “cajoncitos” para meter los discos duros normales. Lo recomiendo…
Samsara –
The media could not be loaded.
Just has got space for everything but won’t fit water cooling setup and top head 360mm radiator.
GPU vertical stacking option also there. Comes with front 3 ARGB fans and rear non rgb fan with controller. Customizable lighting effects with RGB Motherborad software or the built in button on the case near power button. Front mesh panel provides enough cool airflow into the cabinet while maintaining the beauty of RGB. PSU shroud has honeycomb structure ventilation which provides both airflow and rgb effects of psu. Right panel side has got enough space to manage all those messy cable is one more pros. Side tempered glass comes with 4 screws. I wish it would have been hinge mechanism for quick opening. Thats the one con I came across. But worth purchase. Has got everything to be gaming RGB cabinet under 5.5K
KCR1990 –
I just purchased it a few days ago, so I can’t speak for long term. The air flow isn’t as good as a case with a full mesh front, gpu also gets about 10 degrees warmer on idle now with the loss of my old cases side fan.
But I am still very happy with this case, I’ve built 7-8 computers in my life, I’ve always used budget cases sub 50$ as they end up being the last pick when budgets get tight…. so take that as you will, I’ve never had a 100$+ case. This does the job, looks pretty nice, I could fix the cable management a little more but it’s a nice roomy case. I only have a nh-12us fan but a dh15 and a 120mm radiator could fit for sure.
I am happy with the looks and performance of this case for the cost.
Chickenuggets –
Overall an amazing case for the money with 4 built in fans all prewired for convenience. Also comes with the PSU shroud so you can’t see the the wires making it very easy to get a clean looking build.
My only inconvenience with the case was the hard drive trays being a little too close to the back of the power supply making it a tad bit difficult to install the powersupply. But after about 1 1/2 minutes of adjusting wires it slides in with ease. Over all great product from thermaltake!
KCR1990 –
This case looks nice and has a lot of great features. Only minor ‘annoying’ things I will list below.
-I put in a 1050W power supply and there isn’t a lot of room to get the cables into the case because the 3.5″ Drive bay is in the way (extremely tight angle and fit to thread power cable into case AND I needed to plug in what I needed on the power supply before install).
-No slot for 5.25″ DVD player for OS install and I didn’t have an external drive. I hooked up a DVD drive before closing the case to get my OS installed. (yah yah… this PC case building Gamer is behind the curve)
-Glass shield is beautiful but the little sticky grommets for washers move and are easily lost (used to help with vibration dampening between glass and metal). There are four that are used where the finger screws attach the glass to case.
-Front of case fans don’t have a lot of opening to suck in air. Not sure if this was engineered for tighter air flow or designed to make the case look pretty. (I haven’t had many hours on this case to know for sure but this is my first case with more than 3 case fans).
-the circuit board for the ARGB fans on the back is loose because someone didn’t screw it in correctly. They also stripped the F out of the screw. (but nothing to make me return the product or downgrade more)
*** All in all, the case looks awesome! Mesh filter under power supply and on top of the case are not noticeable and look great. Buttons and front USB connections in a good spot. Lots of openings to hide wires on the backside of the case. Comes with some zip ties to help hold them in as well as some mediocre wire hooks built into the backside. Hope this helps. This is a great case. Get an ARGB compatible motherboard if you want some fun with the fans. Or you can just hook your reset switch to the mini ARGB board in the backside ***
Greg Sirmon –
The media could not be loaded.
This was my first attempt to make a really beautiful RGB PC and I’m thrilled with the result. My version was the V250 with 3 pre-installed ARGB fans in the front. I bought 3 additional matching Thermaltake ARGB fans and installed one in the rear and two on my top mounted radiator.
The real gotcha is trying to figure out the pre-installed fans and how to integrate their hardwired fan control hub with motherboard control. The documentation is criminally poor, so it took a lot of guesswork to get everything flowing the way I wanted.
To make a long story not quite as long, here’s what to do: The control hub comes connected to the case reset switch. You need to power up the PC and hit that reset switch for a few seconds, until the front fans flash. This confirms that the control hub is now set to motherboard control instead of case control. You can now safely remove the reset switch wire from the hub and plug it into the reset switch header on your motherboard. The case reset switch will now function as God intended. Now, the tricky part. You’ll need to (for a MSI JRAINBOW motherboard header anyway) connect the 3 prong 5V ARGB cord into both the motherboard and the case fan control hub. In my case, connecting to the motherboard header was no problem, but on the other end, the male plug would absolutely not fit into the receptacle on the hub. I took a risk and shaved off the plastic left and right edges of the cord plug and jammed what was left in the socket on the control hub. I plugged SATA power into the hub as well. Half expecting my rig to burst into flames when I powered on, I was pleasantly surprised that I could now see and control the front case fans in Windows via Mystic Light motherboard control. I have to admit, it’s some really bad quality control for the ARGB control socket on that fan hub to be so small as to be unusable.
A user shouldn’t have to shave a plastic plug down to the bare metal wire for it to fit where it’s intended to go.
Anyway… Next, I needed to add my additional 3 fans to the setup. I plugged their fan speed control wires into motherboard fan headers. I daisy chained their 3 ARGB wires together and plugged the end into the case fan control hub, also not clearly labeled and unexplained in the case documentation. Miracle of miracles, the motherboard now sees all 6 fans and can fully control and coordinate their RGB properties via the MSI software.
I hope this experience helps someone. The final result of putting some time into this case was really rewarding for me.
OMKARADITHYA –
Super easy to use clean lines and quality materials for the price